Hey there, fellow baking enthusiasts! If you’ve ever wondered, “Should I soak apples before making pie?” then lemme tell ya, you’ve stumbled on the right post. I’m here to spill the beans—or rather, the apple juice—on a trick that’s gonna take your pie game on fleek The short answer? Heck yes, you should soak ‘em! But not just in water or some random liquid We’re talkin’ about a lil’ process called macerating, and trust me, it’s a game-changer for that perfect, saucy, non-soggy apple pie you’ve been dreamin’ of.
I’ve had my fair share of pie disasters—crusts that turn to mush, fillings that swim in juice, and apples that just don’t taste right. But once I figured out this soaking trick, my fall baking became the talk of the family. So, grab a cup of coffee (or cider, ‘cause it’s pie season), and let’s dive into why and how you should soak those apples for the best dang pie ever.
What Does Soaking Apples Even Mean?
Before we get into the nitty-gritty, let’s clear up what I mean by “soaking” We ain’t just dunkin’ apples in a bowl of water to keep ‘em from browning—though that’s a thing too When I say soak, I’m mostly talkin’ about macerating. That’s a fancy word for letting your apple slices chill with some sugar, spices, and a pinch of salt to draw out their natural juices. It’s like giving your apples a flavor bath that also preps ‘em for baking.
Why bother? Well, apples got a ton of liquid in ‘em. If you just toss raw slices into a pie crust and bake, all that juice leaks out, soaks the bottom, and leaves you with a sad, soggy mess. Plus, raw apples can stay too firm or unevenly cooked. Macerating pulls out that excess juice beforehand, turns it into a tasty syrup with the sugar and spices, and softens the fruit just enough. No pre-cooking, no extra pots to wash—just pure, easy magic.
Why You Should Soak Apples Before Pie Baking
Lemme break down why this soaking step (aka macerating) is non-negotiable if you want a pie that slaps. Here’s the deal:
- No Soggy Crust, Y’all: When you soak apples, you’re pulling out a bunch of their liquid before they hit the oven. That means less juice to drown your crust, keeping it flaky and crisp.
- Thicker, Saucier Filling: The juice that comes out mixes with sugar and spices to make a concentrated syrup. When you bake, it turns into a luscious, thick filling instead of a watery soup.
- Tender Apples Every Time: Soaking breaks down the apple’s structure a bit, so they bake up tender without turnin’ to mush. No need to stand over a stove pre-cooking ‘em.
- Flavor on Point: Letting apples sit with sugar and warm spices like cinnamon or nutmeg infuses ‘em with extra yum. It’s like marinating meat, but for pie!
- Less Hassle: Unlike stovetop methods, this is hands-off. You just let ‘em sit while you roll out your dough or binge a show. Easy peasy.
I remember the first time I skipped this step—my pie was basically apple soup in a crust Never again Soaking is my secret weapon now, and it should be yours too.
How to Soak Apples for Pie: Step-by-Step Guide
Alright, let’s get down to business. Here’s how I soak my apples to get that perfect pie filling. It’s super simple, even if you’re a baking newbie.
- Pick and Prep Your Apples: Start with fresh apples—more on which kinds later. Peel ‘em, core ‘em, and cut into quarters. Then slice ‘em into about half-inch thick pieces. Keep ‘em uniform so they soak evenly.
- Grab a Zip-Top Bag or Bowl: I prefer a big zip-top bag ‘cause it keeps air out and messes contained. But a bowl works if you cover it tight with plastic wrap pressed right on the apples to stop browning.
- Mix in the Good Stuff: Toss your apple slices into the bag with some brown sugar, a pinch of salt, and spices like cinnamon or nutmeg. I usually eyeball it, but for a standard pie, think about a half-cup of sugar for every 4-5 pounds of apples. Shake or stir to coat everything.
- Let ‘Em Soak: Seal the bag or cover the bowl and let it sit. You can leave it at room temp for at least 3 hours or stick it in the fridge for up to 8 hours. I’ve even let mine go overnight when I got busy. You’ll see juice pooling at the bottom—that’s the gold!
- Add a Thickener Before Baking: After soaking, shake in a bit of tapioca starch or cornstarch to thicken up that juicy syrup. For around 4.5 pounds of apples, a couple tablespoons does the trick. Give it a good mix so it absorbs evenly.
- Fill Your Pie: Dump the apples and all that syrupy goodness into your prepared pie crust. You’re ready to top it and bake!
Pro tip: While they soak, you got time to make your crust from scratch or just kick back. It’s a set-it-and-forget-it kinda deal.
What Apples Should You Use for Pie?
Not all apples are created equal when it comes to pie, and trust me, I’ve learned this the hard way. Some turn to mush, others stay rock-hard, and a few just don’t got the flavor. Since we’re soaking ‘em, you wanna pick a variety that holds up but still gives good juice.
My go-to? Tart apples like Granny Smith. They got high pectin, which helps ‘em keep their shape in the oven, so your filling stays thick, not runny. Plus, that tartness balances the sweet sugar and spices for a killer combo. Here’s a quick rundown of pie-friendly apples:
| Apple Type | Flavor | Texture After Baking | Best For Pie? |
|---|---|---|---|
| Granny Smith | Tart | Holds shape well | Heck yes! |
| Honeycrisp | Sweet-tart | Firm but can soften | Pretty good |
| Braeburn | Balanced | Decent hold | Solid choice |
| Red Delicious | Sweet | Mushy mess | Nope, skip it |
I don’t mess with mixing different apples in one pie neither. They break down at different rates, and you might end up with half mush and half crunch. Stick to one kind per pie for even results. Granny Smiths are my ride-or-die, but if you got a fave, test it out!
Soaking vs. Not Soaking: What’s the Diff?
Still on the fence about soaking? Lemme lay it out for ya with a quick comparison. I’ve done it both ways, and the difference is night and day.
-
Soaking (Macerating):
- Draws out juice before baking, saving your crust.
- Creates a flavored syrup for a rich filling.
- Softens apples for even cooking, no stove needed.
- Takes a few hours but it’s hands-off.
-
Not Soaking:
- Apples release juice in the oven, sogging up the crust.
- Filling can be watery or unevenly cooked.
- Might need pre-cooking on the stove, which is a pain.
- Faster upfront but riskier results.
I ain’t got time for pie fails, so soaking wins every time. Sure, it adds a step, but it’s the kinda step that saves ya from heartbreak later.
Common Mistakes When Soaking Apples (And How to Fix ‘Em)
Even with a trick this easy, there’s ways to mess it up. I’ve been there, done that, and I’m here to steer ya clear of my dumb moves.
- Slicing Too Thin or Uneven: If your apple slices are all over the place, some will turn to goo while others stay hard. Keep ‘em about a half-inch thick and consistent. Use a sharp knife or even a mandoline if you fancy.
- Not Soaking Long Enough: You gotta give it at least 3 hours for the juice to come out. I rushed it once, and my pie was still too wet. Patience, my friend!
- Skipping the Thickener: Don’t forget that tapioca starch or cornstarch at the end. Without it, all that juice you drew out just makes a sloppy filling. Add it after soaking, not before.
- Letting Air Get to ‘Em: If you use a bowl and don’t cover tight, apples brown quick. I’ve had pies lookin’ gray before they even baked. Zip-top bag is safer, or press that plastic wrap down hard.
Mess up? Don’t sweat it. Baking’s all about trial and error. Just tweak it next time, and you’ll be golden.
Extra Tips to Level Up Your Apple Pie
Since we’re already chattin’ pie, lemme throw in some bonus nuggets I’ve picked up over the years. Soaking’s the big secret, but these lil’ extras can make your pie the star of the table.
- Spice It Up: Don’t just stick to cinnamon. A dash of nutmeg, allspice, or even a tiny pinch of cloves can add depth. I like mixin’ it up depending on my mood.
- Brown Sugar Over White: I always use brown sugar for soaking ‘cause it’s got that molasses vibe that pairs so good with apples. White sugar works, but it’s kinda blah.
- Chill Your Crust: While your apples soak, make sure your pie dough stays cold. A warm crust melts before it bakes, and you lose that flake. Pop it in the fridge if you gotta wait.
- Vent That Top: If you’re doing a double-crust pie, cut some slits or get fancy with a lattice. Steam’s gotta escape, or your pie might burst. I learned that after a messy oven explosion!
- Bake on a Sheet: Put a baking sheet under your pie pan in the oven. If juice bubbles over, it saves ya from scrubbin’ burnt sugar off the oven floor. Been there, hated that.
Why Apple Pie Is My Fall Obsession
I gotta confess—apple pie ain’t just food to me; it’s a whole vibe. Every fall, as soon as the air gets crisp and the leaves start droppin’, I’m in the kitchen slicin’ apples like it’s my job. There’s somethin’ ‘bout the smell of cinnamon and baking crust that just screams cozy. I’ve been known to declare “it’s fall, y’all!” to anyone who’ll listen, even if they didn’t ask. And pie’s always the first thing I whip up to celebrate.
I remember one year, I botched my first pie of the season so bad—didn’t soak the apples, crust was a swamp, the works. My family still ate it, bless ‘em, but I knew I had to step up. That’s when I started experimentin’ with soaking and all these tricks. Now, my pies get requests at every gathering, and I ain’t mad about it. It’s like my lil’ claim to fame.
Tackling Other Apple Pie Worries
While soaking solves the big issue of soggy pie, there’s other stuff folks fret about. Lemme hit a few common worries and how I deal with ‘em, ‘cause I wanna make sure you’re set for success.
- Apples Browning Too Fast: If you’re slow at slicing, apples can turn brown before you soak ‘em. I just toss ‘em in the bag with sugar quick as I cut, or you can splash a bit of lemon juice on ‘em first. Keeps ‘em pretty.
- Filling Too Sweet or Bland: Taste a tiny bit of the juice after soaking. If it’s off, adjust with more sugar or a pinch more spice before baking. I’ve saved a few pies this way.
- Crust Not Browning: If your pie looks pale, brush the top with a lil’ egg wash or milk before baking. Gives it that golden glow. I forgot once, and it looked like ghost pie—still tasted good tho!
- Overbaking the Filling: Start checkin’ your pie about 10 minutes before the recipe says. If the edges bubble and the crust is golden, it’s done. I’ve overcooked a couple, and the apples got too soft. Live and learn.
Baking pie ain’t rocket science, but it does take some finesse. Soaking’s your foundation, and these tweaks just build on it.
How Soaking Apples Fits Into Your Baking Routine
One thing I love about this soaking trick is how it fits into a busy day. I ain’t always got hours to stand in the kitchen, and I bet you don’t neither. Since macerating takes a few hours minimum, I plan it around my schedule. Got errands? Slice the apples in the mornin’, toss ‘em with sugar, and let ‘em sit while you’re out. Back home, roll the crust, assemble, and bake. Or do it the night before and fridge ‘em—by mornin’, they’re ready to go.
It’s also a great way to prep ahead for big holiday meals. I’ve done Thanksgiving pies this way, soaking apples a day early so I’m not stressed on the big day. Just don’t add the thickener ‘til right before you fill the pie, or it might clump weird. This method’s all about makin’ life easier, not harder.
Wrapping Up the Apple Soaking Magic
So, should you soak apples before making pie? Abso-frickin’-lutely! Macerating ‘em with sugar and spices ain’t just a step—it’s the secret to a pie that’s got a flaky crust, saucy filling, and tender fruit without the hassle of pre-cooking. I’ve been down the road of pie fails, and this trick turned it all around for me. It’s easy, hands-off, and makes ya look like a baking pro even if you’re just wingin’ it.
We walked through the how-to, from slicing to soaking to baking, plus which apples to pick and mistakes to dodge. I threw in some extra tips and personal stories ‘cause I want you to feel as hyped about pie season as I am. Whether you’re baking for a cozy night in or a big family shindig, soaking your apples is gonna make sure every slice is perfection.
Got questions or your own pie hacks? Drop ‘em below—I’m all ears! And if you try this out, lemme know how it goes. Here’s to pies that don’t just taste good but make ya feel all warm and fuzzy inside. Happy baking, y’all!
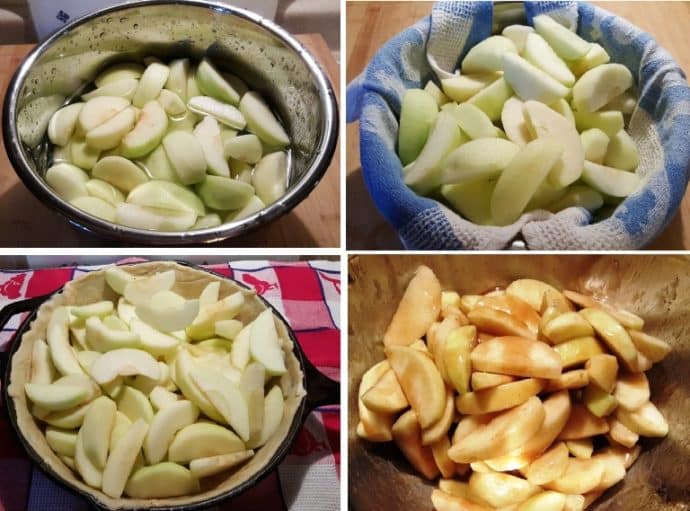
How to Turn Macerated Apples Into Pie Filling
:max_bytes(150000):strip_icc()/__opt__aboutcom__coeus__resources__content_migration__serious_eats__seriouseats.com__s__2017__09__20170730-bravetart-apple-pie-vicky-wasik_collage-2-1013be3b880d415b97328a10995289de.jpg)
To ensure the pie filling is nice and thick, we recommend adding a touch of tapioca starch to the apples. This ingredient absorbs excess liquid, thickening the filling without making it gloopy. Add the tapioca starch to the bag of apples after macerating and before baking, then zip it back up and give it a good shake. (Youll want to use about 1 ounce per 4 1/2 pounds of apples.) Waiting to add the starch after all the juices release from the apples ensures the starch will absorb evenly into the liquid. From there, you’re ready to tuck your apples into the pie plate. (The most exciting part…besides eating the actual pie.)
Why (and How) You Should Macerate Your Apples
When making an apple pie, you want to draw out as much liquid as possible from the fruit so you don’t waterlog the crust, and you also want to make sure the apples are tender. Many apple pie recipes call for pre-cooking your apples to solve those problems, but this can be time-consuming, given that it’s a hands-on task. If the delicate apple slices aren’t monitored closely while cooking, they can quickly overcook, resulting in mushy fruit. Macerating apples helps break down the fruits’ structures and reduces their volume—no cooking or pot-watching required.
:max_bytes(150000):strip_icc()/__opt__aboutcom__coeus__resources__content_migration__serious_eats__seriouseats.com__s__2017__09__20170730-bravetart-apple-pie-vicky-wasik-2-8469ecb913f046fb835c23272f2cc4e4.jpg)
While we recommend macerating in a zip-top bag to limit the apples’ exposure to air, you can use a bowl as long as you cover it tightly with plastic wrap pressed directly into the slices. Even then, you should still expect some oxidation. After peeling, quartering, and coring the apples, cut them into half inch-thick slices, making sure they’re as uniform as possible—this will ensure there is an even surface area across all the slices and that they all break down and release their juices at about the same rate of time. Once your apples are sliced, add them to the bag (or bowl) with the brown sugar, spices, and salt called for in Stella’s recipe. From there, the apples need to sit for at least three hours at room temperature, or up to eight hours in the fridge, which gives you plenty of time to make, roll, and shape your pie crust. During this resting time, the tart juice from the apples will collect at the bottom of the bag. Flavored with brown sugar and spices, this liquid acts as a concentrated syrup in the pie filling.
Why you should use underripe apples for baking #applepie #baking #foodscience
FAQ
How do you prepare apples for pie?
To prepare the apples, peel them first, then cut into quarters and slice out the core. Thinly slice to about 5mm/¼ in thick. If you want to prepare the apples in advance, put the sliced apples in a bowl of water mixed with lemon juice to prevent them going brown.
What is the secret to a good apple pie?
- Keep Your Ingredients Cold.
- Stick With an All-Butter Crust.
- Make a Butter-Flour Paste.
- Use Vodka (or Don’t)
- Fold in Liquid With a Spatula.
- Choose Tart Apples.
- Go Easy on the Seasoning.
- Par-Cook Your Apples.
What do you soak apples in before baking?
Dissolve ⅛ teaspoon kosher salt in 1 cup water. Add the apple slices, let them soak for 1–3 minutes (be careful not to let the apple slices soak too long, or they’ll absorb the salty flavor), then drain them in a colander. Rinse the slices with fresh water.Aug 16, 2023
Should I soften my apples or leave them uncooked for apple pie?
Par-cooking the apples to 160°F (71°C) sets their pectin into a more stable form, helping them retain their shape while remaining tender as they bake. Cornstarch and sugar help thicken the juices into a gooey syrup, while lemon juice gives it a bright flavor.