This perfect homemade freezer apple pie filling is easy to make, and super-delicious. Bite after bite of juicy apples are perfectly sweetened and ready to pour into your favorite pie crust. From Fall family feasts to holiday dinners to Summertime picnics, this is the undisputed champion of American desserts. And we’ve just made it easier than ever to prepare!
I’m just gonna say it: Pie is better than cake. Cake may have cornered the market on birthdays and weddings, but as far as desserts go, it’s a show pony. Professional dessert lovers know that a homemade pie is unbeatable.
And the mother of all pies is the old-fashioned, all-American, apple pie. I love it nice and warm, but apple pie is delicious at every temperature. Some like it chilled, straight from the fridge. My hubby’s favorite is kitchen-counter temperature (late at night when everyone is sleeping!)
Whipped cream is the topping of choice for most people, although my friends in New England insist that apple pie isn’t complete without a nice slice of sharp cheddar cheese.
I’ve tried it that way and it’s not bad – but for me there’s nothing better than apple pie à la mode. Warm apple pie with a scoop of vanilla ice cream that’s just starting to melt and drip down the sides… Mmmm…yes, please!
As delicious as apple pie can be, it requires some prep work. But the beauty of this recipe is that it’s designed to let you make the pie filling in advance and freeze it ‘til you need it.
Whether you make your pie crust from scratch or opt for a ready-made frozen pie crust, this is the time-saver you need for the apple pie you love. In about 55 minutes you’ll have 4 batches of pie filling to freeze to use throughout the season.
Special occasion? Holiday dinner? Fun, family treat? Just grab a bag of this make ahead pie filling and you’re halfway done. It’s as close as we may ever come to homemade pie on-demand (a lifelong fantasy of mine).
Hey there, pie lovers! If you’ve ever wondered, “Can you freeze apples for pie filling?”—I’m here to tell ya, absolutely, you can! This little kitchen hack has saved me tons of time, especially during apple season when I’ve got more fruit than I know what to do with. Freezing apples means you can have that warm, cozy apple pie ready to go any dang time, without the hassle of peeling and slicing every single time you crave a slice.
In this post, I’m gonna walk you through everything you need to know about freezing apples for pie filling We’re talking why it’s a game-changer, the best apples to use, step-by-step methods, and even some pro tips to avoid a soggy mess So, grab a cup of coffee (or a slice of pie if you’ve got one handy), and let’s get into this pie-ready magic!
Why Freeze Apples for Pie Filling? It’s a Total Time-Saver!
Before we dive into the nitty-gritty let’s chat about why you’d wanna freeze apples in the first place. I mean fresh apples are great, but life gets busy, right? Here’s why this trick is worth it
- Saves Time Like Crazy: Peel, core, and slice once, then you’re set for months. No more last-minute kitchen marathons before a holiday dinner.
- Preserves Freshness: Freezing locks in that just-picked taste for up to a whole year. You can enjoy apple pie even when your fave variety ain’t in season.
- Cuts Down on Waste: Got a bumper crop or a sale haul? Freeze ‘em before they go bad, and nothing goes to waste.
- Pie on Demand: Imagine pulling out a bag of prepped apples or filling and being halfway to a homemade pie in minutes. That’s the dream, folks!
I remember the first time I tried this—had a pile of apples from a friend’s orchard, and no way was I baking five pies in one weekend. Freezing ‘em meant I could spread out the joy (and the calories) over months. Trust me it’s a lifesaver.
Can You Really Freeze Apples for Pie Filling? Yes, and Here’s the Proof!
So, to answer the big question straight up: Yes, you can freeze apples for pie filling, and it works like a charm if you do it right. You’ve got two main ways to go about it—freezing just the raw apples or making a full-on pie filling mix to freeze. Both methods keep the fruit fresh and ready for baking, and I’ve done ‘em both with killer results. The key is preventing browning and storing ‘em properly so they don’t turn to mush. Let’s break it down so you know exactly what to do.
Best Apples to Freeze for Pie Filling
Not all apples are created equal when it comes to pie, y’all. Some hold up better after freezing and baking, while others turn into a sad, mealy mess. Here’s a quick rundown of the best picks for freezing, based on my own kitchen disasters and wins:
| Apple Type | Flavor Profile | Texture After Freezing/Baking | Why It’s Great for Pie |
|---|---|---|---|
| Granny Smith | Tart | Firm and crisp | Holds shape, adds a zingy bite to balance sugar |
| Honeycrisp | Sweet-tart | Crisp, juicy | Stays firm, awesome flavor |
| Golden Delicious | Sweet | Firm enough | Great for sweeter pies, blends well |
| Braeburn | Sweet-tart | Holds up decently | Nice balance, doesn’t get too soft |
| Jonathan | Tart | Pretty firm | Classic pie apple, good structure |
Avoid These: Steer clear of Red Delicious or Gala—they get mushy after baking, and nobody wants a soggy pie. I made that mistake once, and it was more like apple soup than pie. Yuck!
Pick apples that are ripe, firm, and juicy with no brown spots or decay. If you can, mix a couple varieties for a complex flavor—Granny Smith with Honeycrisp is my go-to combo for that sweet-tart punch.
Method 1: Freezing Raw Apples for Pie Filling
Alright, let’s get into the first way to do this—freezing raw apples. This is perfect if you just wanna prep the fruit now and figure out the filling details later. Here’s how I do it, step by step:
- Pick and Wash ‘Em: Grab your apples (firm ones, remember!) and give ‘em a good rinse under cold water to get off any dirt or residue.
- Peel and Slice: Use a peeler and knife, or one of them fancy apple corer-slicer gadgets if you’ve got it. I usually peel, core, then slice into 6-8 pieces for medium apples, or 10-12 for bigger ones. Thinner slices work too if you like ‘em smaller in your pie.
- Prevent Browning: Here’s the trick—apples turn brown quick once cut, so ya gotta act fast. Mix up a soak with either:
- 1.5 grams of vitamin C powder (like ascorbic acid) in 3 tablespoons of water, or
- 3 tablespoons of lemon juice in a small bowl with water.
Coat the slices in this mix right after cutting. I’ve used lemon juice mostly ‘cause it’s always in my fridge, and it works a treat.
- Pack ‘Em Up: Toss the coated slices into a freezer bag. Squeeze out as much air as you can—air is the enemy of freshness. Leave a little space in the bag since they’ll expand a bit when frozen.
- Label and Freeze: Use a marker to jot down the date on the bag. Pop it in the freezer, and you’re good for up to 12 months. Pro tip: Lay the bag flat so the slices don’t clump together. I’ve also put parchment paper between layers to keep ‘em from sticking, which is a real pain-saver later.
Quick Note: You can freeze whole cored apples without slicing, but trust me, cutting frozen apples is a nightmare. Slice now, thank me later.
Method 2: Freezing a Complete Apple Pie Filling
If you wanna go full-on pie-ready, you can make and freeze the whole filling with spices and all. This is my fave method when I know I’ve got a busy month ahead. Here’s the recipe I swear by:
Ingredients for One Pie (Double or Triple as Needed)
- 4-6 medium apples, peeled, cored, and sliced
- 3 tablespoons lemon juice (for soaking)
- 3 tablespoons water (for soaking)
- ¾ cup sugar (adjust if you like it less sweet)
- 2 tablespoons all-purpose flour (for thickening)
- ¼ teaspoon salt (don’t skip, it boosts flavor)
- ¾ teaspoon ground cinnamon
- 1/8 teaspoon ground nutmeg (optional, but I love the warmth)
Steps to Make and Freeze
- Prep the Apples: Same deal as before—peel, core, slice. Soak ‘em in a mix of lemon juice and water to stop browning. Set aside while you mix the rest.
- Mix Dry Stuff: In a separate bowl, combine sugar, flour, salt, cinnamon, and nutmeg. Stir it up good so it’s even.
- Combine: Drain the apples a bit, then toss ‘em with the dry mix until they’re all coated. This is your pie filling, ready to roll!
- Pack for Freezing: Spoon this mix into a freezer-safe bag or container. Squeeze out excess air, seal tight, and label with the date. Lay flat in the freezer for easy stacking.
- Store: This filling keeps fresh for up to 12 months. I usually make a few batches at once to have pies ready for holidays or random cravings.
How to Use Frozen Apples or Filling in a Pie
Now that you’ve got your apples or filling frozen, let’s talk baking. There’s a bit of a debate here—thaw or not to thaw? I’ve tried both ways, and here’s the lowdown:
Option 1: Baking with Thawed Apples/Filling
- How: Pop the bag or container in the fridge overnight (or up to 48 hours for a full filling mix). Once thawed, squeeze it into your pie crust (bottom crust already in the pan). Add a top crust if you’re doing that style, cut some slits for steam, and brush with a beaten egg for a golden look.
- Bake: Preheat your oven to 400-425°F. Bake for 12-15 minutes, then drop the heat to 350-375°F for another 35-45 minutes. Look for a golden crust and bubbly apples.
- Pros: Thawing can make it easier to work with, and some folks say it blends flavors better.
- Cons: Apples release extra liquid when thawed, which might make your pie a tad soggy if you don’t adjust with extra thickener (like flour or cornstarch).
Option 2: Baking Straight from Frozen
- How: Don’t thaw—take that filling or apple mix straight from freezer to pie crust. Line your pie pan with bottom crust, add the frozen stuff, dot with 2 tablespoons of butter on top, then cover with top crust (slits and all). Cover the top loosely with foil to avoid over-browning at first.
- Bake: Start hot at 450°F for 15 minutes, then lower to 375°F for another 15 minutes. Remove foil and bake 45-50 more minutes until bubbly and crust is brown.
- Pros: Less liquid release means less chance of sogginess. I’ve had crisper crusts this way.
- Cons: Takes longer to bake, and you gotta watch the crust don’t burn before the middle’s done. Use a pie shield or foil strips on the edges if needed.
Must-Do Tip: Whichever way you go, put a baking sheet or foil under your pie in the oven. Them juices will bubble over, and cleaning an oven ain’t my idea of fun. I’ve learned this the hard way, believe me!
Pro Tips to Nail Your Frozen Apple Pie
I’ve made plenty of pies over the years, and lemme tell ya, there’s a few tricks to make sure your frozen apple pie don’t flop. Here’s what I’ve picked up:
- Pack Tight, But Not Too Tight: When freezing, pack apples in but leave a smidge of room for expansion. Overstuffing can bust your bag—yep, happened to me.
- Double Check Air: Air in the freezer bag causes freezer burn, which makes apples taste like cardboard. Squeeze it out good!
- Use a Shield: If your crust edges brown too fast, slap on a silicone pie shield or some foil strips. Take it off for the last 15 minutes of baking for even color.
- Taste Test Apples: Before freezing a big batch, cook a small test pie with your apple mix. Some varieties soften more than others after freezing, and you don’t wanna be surprised.
- Add Butter Last: If you’re freezing just apples, don’t add butter until baking day. Dot it on top of the filling right before the top crust for max flakiness.
Other Cool Uses for Frozen Apples
Pie ain’t the only game in town, folks! If you’ve got extra frozen apples, here’s other yummy ways to use ‘em:
- Apple Crisp: Toss frozen apples (thawed or not) into a greased baking dish, top with a crumbly mix of oats, flour, sugar, and butter, then bake ‘til golden. Easy peasy.
- Apple Cobbler: Similar to crisp, but with a biscuit-like topping. Frozen apples work perfect here.
- Simple Dessert: Heat up some frozen slices with a sprinkle of cinnamon and sugar in the oven or microwave for a quick sweet fix.
- Smoothies: Yeah, toss a few frozen slices into a blender with yogurt and banana for a chilly treat. I do this when I’m tryna be healthy-ish.
Common Questions About Freezing Apples for Pie Filling
I’ve had friends ask me a buncha questions about this over the years, so let’s tackle some of the big ones. If you’ve got more, hit me up in the comments!
How Long Can You Freeze Apples?
If you pack ‘em right—air out, good bags or containers—frozen apples or filling can last up to 12 months. I’ve never kept ‘em that long ‘cause we eat ‘em up, but after a year, they might start getting soft or freezer-burned. Best to use within the year for top quality.
Do Frozen Apples Get Mushy?
They can, if you don’t pick the right kind or if you thaw ‘em wrong. Stick with firm apples like Granny Smith, and if you’re worried, bake straight from frozen to keep the texture tighter. I’ve had mushy pies before, and it’s usually ‘cause I used the wrong apple or let ‘em sit thawed too long.
Can You Freeze a Whole Pie with Crust?
Yup, you sure can! Make the whole pie—bottom crust, filling, top crust—and wrap it tight in plastic wrap, then foil or a freezer bag. Bake it straight from frozen at the same temps I mentioned earlier (start at 450°F, then down to 375°F). Just don’t thaw first, or you’ll get a soggy bottom. I’ve done this for Thanksgiving prep, and it’s a stress-buster.
What If My Pie Gets Soggy?
Sogginess usually comes from too much liquid. If you thaw first, pat the apples dry a bit before adding to the crust, or toss in an extra spoonful of flour or cornstarch to soak up juice. Baking from frozen helps too. And always, always vent that top crust with slits so steam escapes.
Why This Hack Is My Secret Weapon
I gotta be real with ya—freezing apples for pie filling ain’t just about saving time, though that’s huge. It’s about capturing that fresh apple taste any time of year. There’s something so darn satisfying about pulling a bag of summer apples outta the freezer in the dead of winter and baking up a pie that smells like fall. It’s like a little hug from warmer days, ya know?
Plus, it’s made me the go-to pie person in my family. Every holiday, I’ve got a stash ready, and I look like some kinda baking wizard without breaking a sweat. You can have that rep too—just follow these steps, and you’ll be golden.
Troubleshooting: When Things Go Wonky
Even with the best plans, stuff can go sideways. Here’s how to fix common oopsies I’ve run into:
- Freezer Burn: If your apples taste off or look dry, you didn’t seal the bag tight enough. Next time, double-bag or use a vacuum sealer if you’ve got one. For now, trim off bad spots and use in a smoothie where flavor’s less key.
- Clumpy Slices: Forgot parchment paper and they’re stuck together? Run the bag under cool water for a sec to loosen ‘em up, or just break apart with your hands. It’s a pain, but doable.
- Too Sweet or Bland Filling: If you froze the full mix and it ain’t right when you bake, adjust on baking day. Add a squeeze of lemon for tartness or a pinch more cinnamon for warmth before popping it in the oven.
Wrapping It Up: Freeze Your Way to Pie Heaven
So, can you freeze apples for pie filling? Heck yeah, you can, and I hope I’ve shown ya how easy it is! Whether you’re just stashing raw slices or whipping up a full spiced filling to freeze, this trick means you’re always a step away from a killer apple pie. Pick the right apples, soak ‘em to stop browning, pack ‘em tight, and freeze for up to a year. Then bake—thawed or straight from frozen—and enjoy the fruits of your labor (see what I did there?).
I’ve been doing this for years now, and it’s changed how I handle apple season. No more stress, just pie whenever the mood strikes. Try it out, mess around with your fave apple combos, and lemme know how it goes. Got a secret pie tip of your own? Share it below—I’m always up for learning a new kitchen hack!
Now, go get freezing, and let’s make pie season last all year long!

HOW DO I USE THIS FILLING IN A PIE?
Begin to thaw the frozen apple pie filling by placing the bag in the fridge 2 days before making pie. Once thawed, simply squeeze the filling out of the bag. Prep your pie pan by adding your bottom crust into the pan. Squeeze filling into pan and add top crust on top. Brush with 1 beaten egg, and then bake pie in preheated oven at 425 degrees for 15 minutes. Then reduce heat to 350 degrees and continue baking for 35-40 minutes or until crust is golden and apples are bubbling.
A silicone pie crust shield will protect the outer ring of your crust from burning. You can also use strips of aluminum foil. Be sure to remove your protective ring for the last 15 minutes of baking.
How to use it in apple crisp: In a lightly greased baking dish pour the filling into 8×8 pan. Top with apple crisp topping then bake as directed. Here is my recipe for the best ever apple crisp.
If you want to can this recipe I recommend not adding the apples after cooking the syrup. Drain the apples then mix them with 3 tablespoons fresh squeezed lemon juice. Pack the apples into about 7-8 quart sized jars, pour syrup into jars and use knife to remove air bubbles. Seal and process for 20 minutes in a water bath canner.
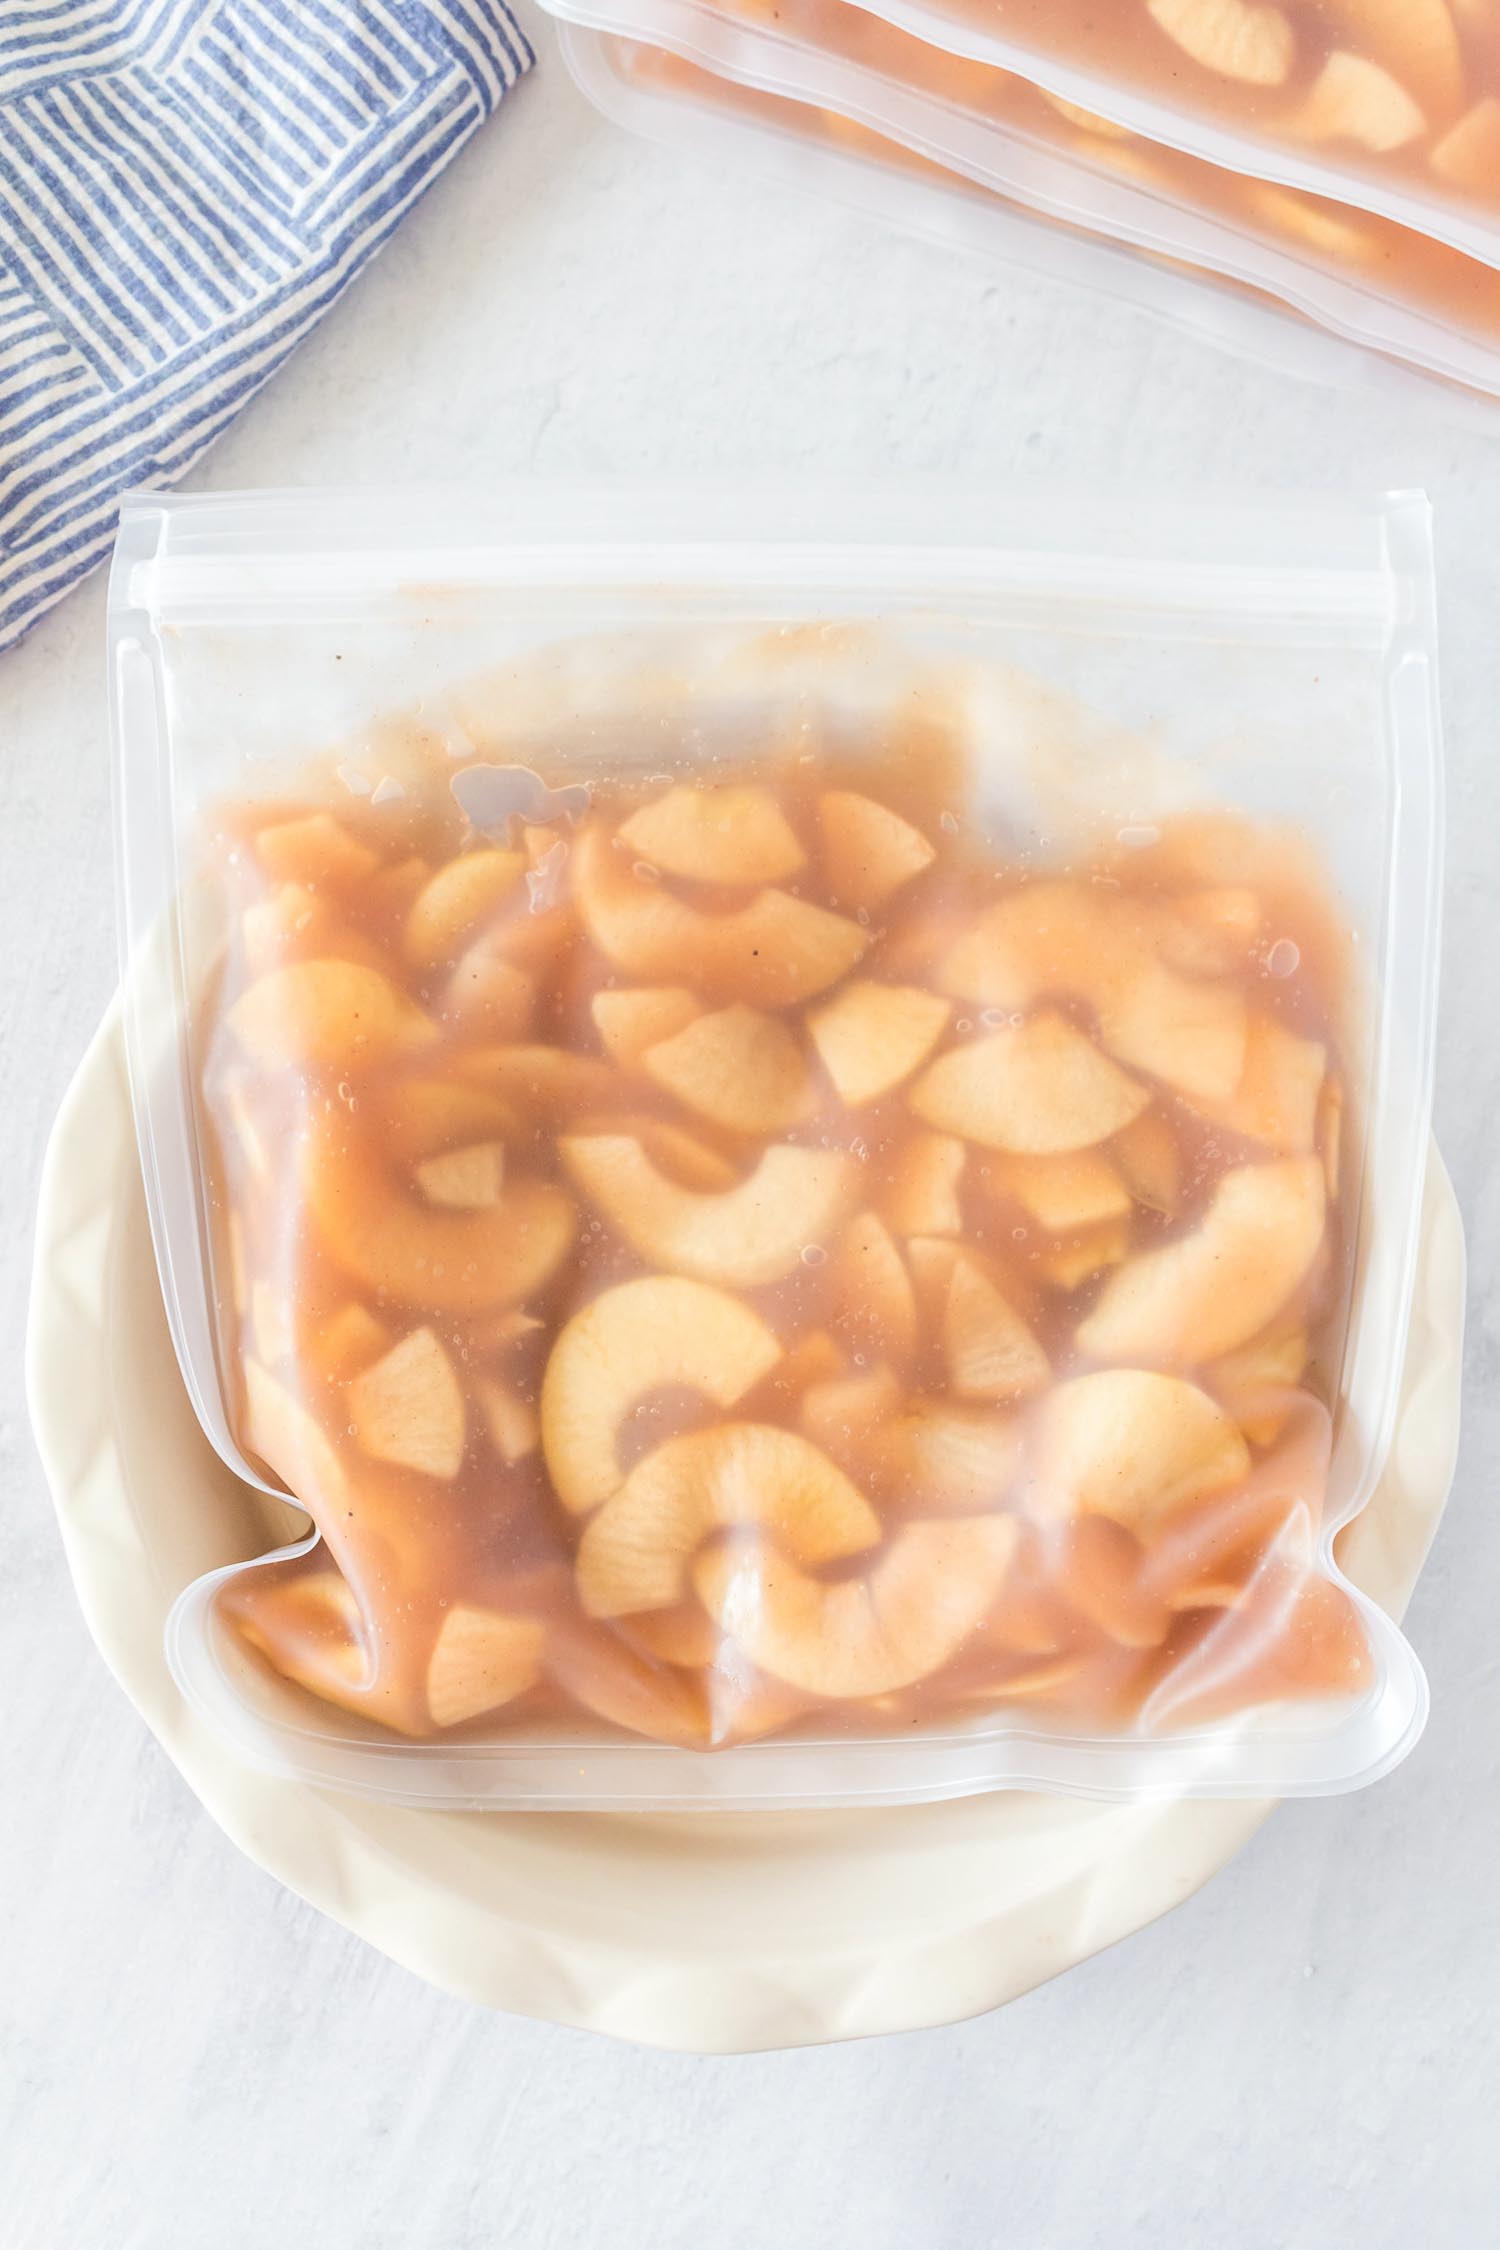
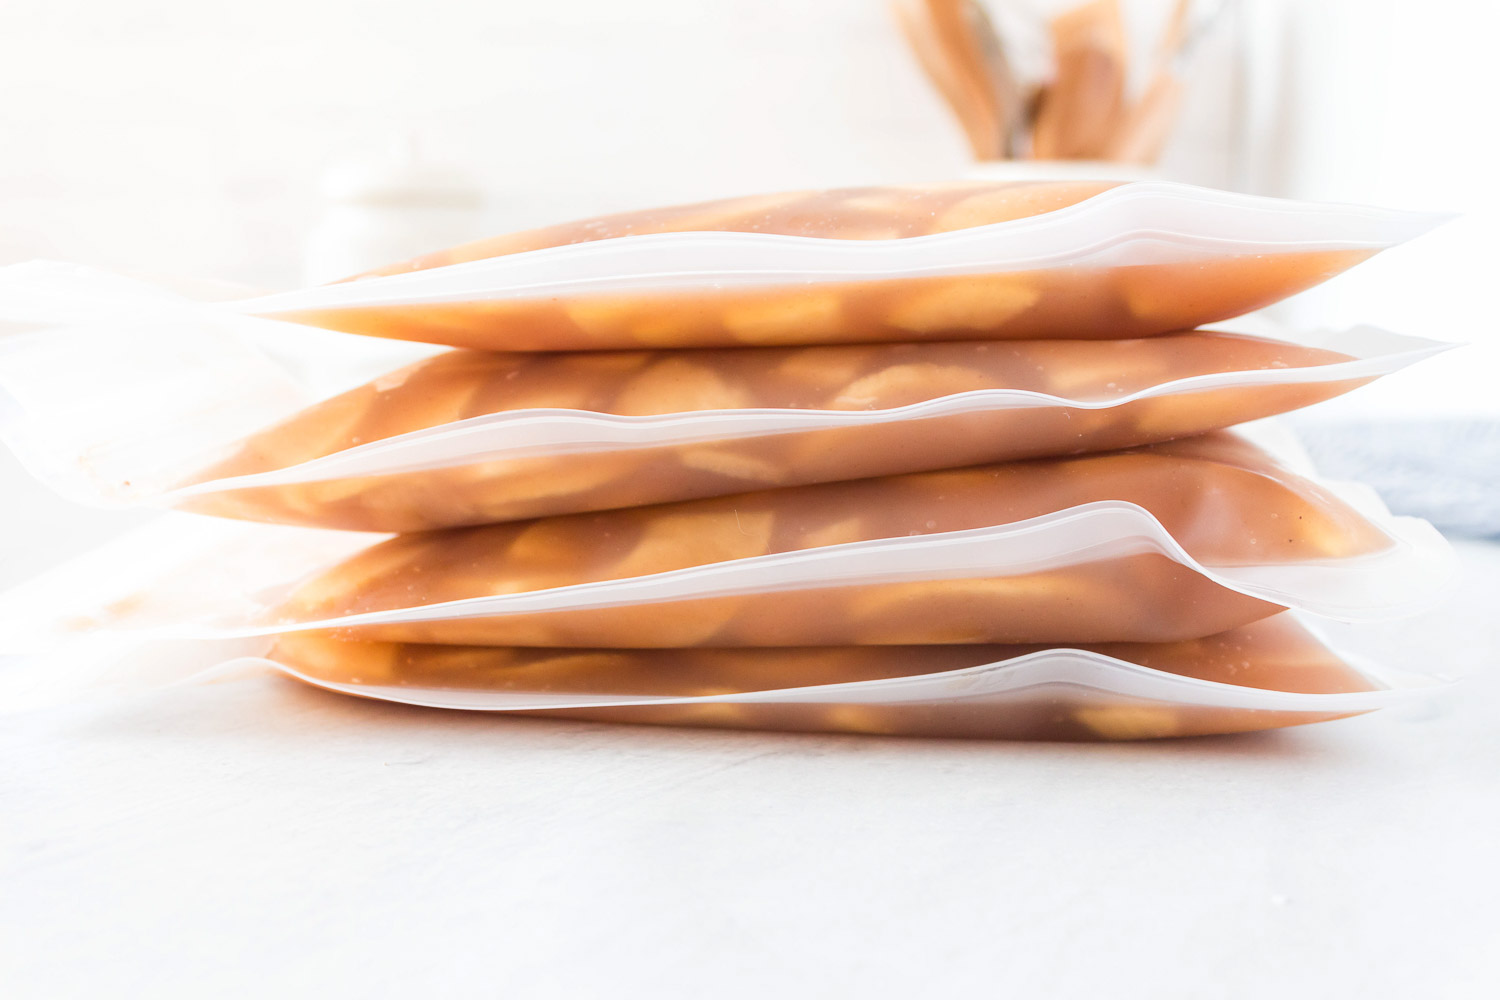
HOW DO I FREEZE APPLE PIE FILLING?
Ladle 5 cups of cooled apple pie filling into each gallon-sized freezer safe bag. Seal bag, removing as much air as possible and freeze flat. Can be stored for up to a year in the freezer. Recipe makes 4 bags. Each bag = 1 pie.
To use, simply thaw in the refrigerator for 24-48 hours and then add to pie crust as usual.