Hey there, kitchen warriors! Are you tired of wrestling with apples, trying to peel, core, and slice ‘em without losing half the fruit—or your patience? Well, lemme introduce ya to a game-changer the Pampered Chef Apple Peeler This lil’ gadget is like having an extra set of hands in the kitchen, makin’ apple prep a breeze for pies, snacks, or whatever apple-y goodness you’re cookin’ up At our lil’ corner of the cooking world, we’re all about makin’ life easier, and today, I’m gonna walk ya through exactly how to use this bad boy. Trust me, once you get the hang of it, you’ll wonder how ya ever survived without it!
In this post, we’re divin’ straight into the nitty-gritty of usin’ the Pampered Chef Apple Peeler, Corer, and Slicer I’ll break it down in simple terms, share some personal tips (and maybe a few kitchen fails), and make sure you’re ready to tackle a bushel of apples like a pro So, grab a cup of coffee, and let’s get to it!
What’s This Pampered Chef Apple Peeler All About?
Before we get our hands dirty, let’s chat about what this tool actually is. Picture this: a nifty device that peels, cores, and slices your apples in one smooth motion. No more fiddlin’ with knives or losin’ half the apple to uneven cuts. It’s built to save ya time, keep things consistent, and cut down on waste. Whether you’re bakin’ a pie for Thanksgiving or just preppin’ a quick snack for the kiddos, this peeler’s got your back.
Here’s why we love it over at our kitchen
- Speedy as Heck: It gets the job done way faster than manual peeling.
- Less Mess, Less Waste: Peels super thin, so you ain’t throwin’ away half the apple.
- Uniform Slices: Perfect for when ya want your dish to look fancy.
- Easy-Peasy: Even if you’re a kitchen newbie, you’ll figure it out quick.
- Not Just for Apples: Yeah, it works on other stuff too (more on that later!).
Now that ya got the gist, let’s roll up our sleeves and figure out how to use this thing.
Settin’ Up Your Pampered Chef Apple Peeler
First things first, ya gotta set this baby up right. A good setup means smooth sailin’ when you start crankin’ that handle. Here’s how I do it in my kitchen:
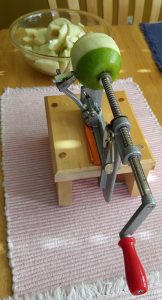
- Secure the Base: This peeler’s got a suction base that sticks to your counter. Make sure your surface is clean and flat—don’t try stickin’ it on a crumb-covered mess or it won’t hold. Press it down firm, then flip the lever to lock it in place. Give it a lil’ tug to check if it’s steady.
- Pop on an Apple: Grab an apple and stick it on the pronged holder thingy. Make sure it’s centered—kinda like balancin’ a tire. If it’s lopsided, you’re gonna have a wobbly mess.
- Adjust the Blade: There’s a lil’ blade that does the peeling. Position it so it’s close to the apple skin but not diggin’ in too deep. You might need a test run to get it just right.
That’s it for setup! Takes like two minutes once ya get the hang of it. Pro tip from yours truly: I keep a damp cloth nearby to wipe down the counter first—helps that suction base grip like a champ.
The Peelin’, Corin’, and Slicin’ Magic: Step by Step
Alright, now for the fun part—actually usin’ this thing! It’s super straightforward, but I’ll walk ya through it nice and slow so ya don’t miss a beat. Here’s how we roll in my kitchen:
- Crank That Handle: With your apple mounted and the blade set, start turnin’ the handle clockwise. Go slow at first—watch how the blade glides over the skin. It’s kinda satisfyin’, ain’t it?
- Check the Peel: Keep an eye on how it’s peelin’. If it’s missin’ spots or cuttin’ too thick, pause and tweak the blade position a smidge.
- Let It Do Its Thing: As ya turn, the peeler not only strips the skin but also cores the apple and slices it into a spiral. It’s like magic—one long, continuous ribbon of apple!
- Take It Off: Once it’s done, carefully slide the apple off the holder. You’ll have a peeled, cored, sliced apple ready to go. Repeat with the rest of your stash.
I remember the first time I used mine—had a pile of apples for a pie and got through ‘em in like ten minutes flat. Felt like a dang superhero! If you’re preppin’ a big batch, just keep a bowl nearby to catch all them perfect slices.
Why This Tool Beats the Old-School Way
Now, lemme tell ya why I ditched manual peelin’ for good after gettin’ this peeler. I used to spend forever with a paring knife, endin’ up with uneven chunks and a pile of wasted apple bits. Not no more! Here’s a quick comparison to show ya what I mean:
| Method | Speed | Waste | Consistency | Effort |
|---|---|---|---|---|
| Pampered Chef Apple Peeler | Super Fast | Barely Any | Top-Notch | Easy |
| Manual Peelin’ with Knife | Slow as Molasses | Quite a Bit | All Over the Place | High |
| Electric Peeler (Other Brands) | Pretty Fast | Some | Decent | Low |
See what I’m gettin’ at? This peeler wins hands down for speed and keepin’ things neat. Plus, less effort means I got energy left to actually bake somethin’ instead of collapsin’ after preppin’.
Troubleshootin’ Common Hiccups
Even with a slick tool like this, ya might hit a snag or two. Don’t sweat it—I’ve been there, and I got some fixes for ya. Here’s the common stuff and how to handle ‘em:
- Apple Won’t Stay Put: If your apple keeps slippin’ off the prongs, double-check it’s centered. Sometimes I gotta push it down a lil’ harder. If it’s still actin’ up, try a slightly smaller apple.
- Peelin’ Ain’t Even: This usually happens if the blade’s off. Stop and adjust it so it’s hittin’ the skin just right. If it’s still funky, the blade might be dull—more on sharpenin’ later.
- Handle’s Hard to Turn: Check for gunk or bits of apple stuck in there. Clean it up, make sure the apple’s lined up proper. A tiny dab of food-safe lube on the movin’ parts can help too.
- Suction Base Won’t Stick: Ugh, hate when this happens! Wipe down the base and counter with a damp cloth. Sometimes a lil’ water on the suction part helps it grip better.
I had the suction issue once durin’ a holiday baking frenzy—turns out my counter had a sneaky layer of flour messin’ things up. Quick wipe, and boom, problem solved.
Cleanin’ and Carin’ for Your Peeler
After all that apple action, ya gotta clean this thing up to keep it in tip-top shape. Trust me, don’t skip this part, or you’ll regret it next time ya pull it out. Here’s my routine:
- Take It Apart: Disassemble all the pieces after you’re done. It comes apart easy, no fancy tools needed.
- Wash It Good: Use warm, soapy water and a soft sponge. Don’t go usin’ harsh scrubbers—they’ll scratch it up somethin’ fierce.
- Dry It Thorough: Make sure every bit is dry before puttin’ it back together. I just lay it out on a towel for a bit.
- Store It Right: Keep it in a dry spot, away from heat or sunlight. I disassemble mine for storage to save space in my crowded drawers.
Quick note: I don’t toss mine in the dishwasher, even if some parts might handle it. Hand-washin’ keeps it lookin’ new longer. Had a friend ruin theirs with harsh detergent in the machine—don’t make that mistake!
Beyond Apples: Other Cool Uses
Here’s where this peeler gets even cooler—it ain’t just a one-trick pony! I’ve experimented a bunch, and ya can use it for other goodies too. Check out these ideas:
- Pears: Works awesome for pears if you’re bakin’ or cannin’. Same process, just watch the softer ones—they can get mushy.
- Potatoes: Need to peel a bunch for mash or fries? This thing flies through ‘em. Saves so much time!
- Sweet Taters: I’ve used it for sweet potato fries, and the slices come out real even. Perfect for roastin’.
- Radishes: Sounds weird, but ya can slice radishes into funky spirals for salads. Makes ‘em look all gourmet.
I tried potatoes the other day for a big family dinner, and lemme tell ya, it was a lifesaver. No more standin’ there for ages with a peeler in hand. Just remember, results might vary dependin’ on the size or firmness of whatever you’re tryin’.
FAQs: Stuff Ya Might Be Wonderin’
I’ve gotten a lotta questions from friends about this peeler, so I figured I’d toss in some answers to the stuff ya might be curious about.
- Can it handle all kinda apples? Most of ‘em, yeah. Firmer ones like Granny Smith work best. Super soft or wonky-shaped ones might give ya trouble.
- How do I sharpen the blade if it gets dull? Ya can use a sharpening stone or a small honing tool. Be real careful though—don’t wanna nick yourself.
- What if my apple’s too big or small? It’s made for standard sizes. Too big, and it won’t fit; too small, and it won’t hold. Pick apples in that sweet spot.
- Can I change how thick it peels? Yup! There’s a knob to adjust the blade. Play around till ya find what ya like—thinner for less waste, thicker for some recipes.
- Best way to clean the suction base? Just warm, soapy water and a soft cloth. Don’t scrub hard, and dry it complete before usin’ again.
Got more questions? Hit me up in the comments, and I’ll do my best to help ya out!
Is This Peeler Worth Your Dough?
Alright, let’s talk straight. Is shellin’ out for the Pampered Chef Apple Peeler worth it? In my book, heck yeah, ‘specially if you’re dealin’ with apples or similar fruits a lot. It saves ya time, keeps your slices lookin’ pro, and cuts down on the mess. I’ve used mine for everything from holiday pies to quick after-school snacks, and it’s paid for itself in sheer convenience.
If you’re just peelin’ an apple here and there, maybe stick to a knife. But for anyone crankin’ out batches of fruit or veggies, this thing’s a must-have. Plus, it’s durable if ya take care of it right.
Tips and Tricks from My Kitchen to Yours
Over time, I’ve picked up a few lil’ hacks for gettin’ the most outta this peeler. Here’s some extras to make your life easier:
- Pick the Right Apples: Go for firm, medium-sized ones. They hold up best and peel like a dream.
- Keep a Bowl Handy: Catch all them slices as they come off. Keeps your counter from turnin’ into a sticky disaster.
- Test Blade Adjustments: Don’t be afraid to fiddle with the blade settin’. Took me a couple tries to nail the perfect peel thickness.
- Use for Decor: Them spiral slices look real pretty on a dessert plate. I’ve wowed guests with just a lil’ apple flair!
One time, I was rushin’ and didn’t adjust the blade right—ended up with half-peeled apples and a lotta frustration. Slow down the first few times till ya get your groove.
Wrappin’ It Up: Your Turn to Shine!
So there ya have it, folks—a full rundown on how to use the Pampered Chef Apple Peeler like a boss. From settin’ it up to crankin’ out perfect apple spirals, cleanin’ it up, and even tryin’ it on other stuff, this tool’s gonna change how ya prep in the kitchen. I’ve shared my go-to steps, some oops moments, and all the tips I wish I’d known when I started.
Now it’s your turn! Grab that peeler, snag some apples, and give it a whirl. Whether you’re bakin’ up a storm or just want a quick snack, this gadget’s gonna be your new fave. Got any cool recipes or hacks with yours? Drop ‘em below—I’m always lookin’ for new ideas to try in my kitchen.
Here’s to less hassle and more tasty apple treats. Let’s keep cookin’, y’all!

What Is an Apple Peeler/Corer?
 Apple peelers, once called apply parers, are gadgets that peel, slice, and core apples, making this time-consuming kitchen task much quicker and easier.
Most models of apple peeler, slicer, and corer are mechanical in nature, using a crank to push the apple through the device. However, electronic versions also exist.
They first came into demand as early as the 1700s when a growing need for apples as a winter staple for both food and drink became apparent. In order to store this fruit, they needed to be processed and peeling, coring and slicing by hand were cumbersome, slow and, in some cases, wasteful. Therefore inventors started creating a variety of gadgets that would get the job done.
You can learn more about the history of apple peelers at The Virtual Apple Parer Museum and at the Museum of the City of New York.
Varieties of Apple Peeler and Corers
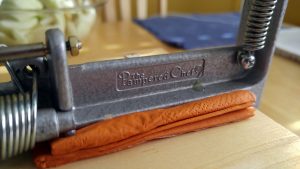 Apple slicers come in two basic types: One that simply removes the core and slices the apple into eight slices, and one that peels, cores and slices to whatever width you choose. In this post, I’m talking about the latter. The one I have is from The Pampered Chef, which I mount upon their apple peeler stand. You can purchase them separately, or as a set. However other companies make these kitchen gadgets, as well.