Hey there pie lovers! If you’ve got a frozen Dutch apple pie sittin’ in your freezer and you’re wonderin’ how to turn it into a warm crumbly, apple-filled masterpiece, you’ve come to the right spot. I’m gonna walk ya through every single step of baking a frozen Dutch apple pie, from preheating that oven to slicin’ up a piece of heaven. We’re talkin’ simple, no-fuss instructions with all the deets you need to nail it, even if you ain’t baked a pie in your life. So, grab a cup of coffee, and let’s get this baking party started!
Why Dutch Apple Pie is the Bomb (and Why Frozen is a Game-Changer)
First things first, let’s chat about why Dutch apple pie is straight-up amazing. Unlike your classic two-crust apple pie, this bad boy has a buttery, crumbly topping that’s like a cookie and a pie had a delicious baby. It’s packed with juicy, cinnamon-spiced apples and that streusel top just crunches in all the right ways. Now, when it’s frozen? That’s a whole other level of awesome. You can have pie ready to bake whenever the craving hits—no peeling apples or rolling dough on a busy Tuesday night. Whether you made it ahead or snagged one from the store, baking from frozen is a lifesaver for holidays, last-minute guests, or just coz you deserve it.
Let me tell ya, I’ve been baking these pies for years, and the frozen trick has saved my butt more times than I can count. Got company comin’ over in a few hours? Pop that pie in the oven straight from the freezer, and boom, you’re a hero. So, let’s dive into the nitty-gritty of how to do this right.
What You’ll Need Before You Start
Before we crank up the heat, let’s make sure you got everything ready. Don’t worry, it ain’t a long list, and most of this stuff is probably sittin’ in your kitchen already.
- Frozen Dutch Apple Pie: Whether it’s homemade or store-bought, make sure it’s fully frozen. No thawing needed—trust me on this.
- Oven: Gotta have one that can hit at least 400°F. Most standard ovens will do just fine.
- Cookie Sheet: A flat baking sheet lined with foil or parchment to catch any drippy pie juices. Saves you a mess later.
- Foil: Heavy-duty if ya got it, for covering the pie if it starts browning too quick.
- Oven Mitts: Protect them hands when pullin’ out that hot pie.
- Knife or Fork: To check if the apples are tender and done.
That’s it! No fancy gadgets or chef skills required. Now let’s get to the main event.
Step-by-Step: How to Bake a Frozen Dutch Apple Pie
Baking a frozen pie might sound intimidatin’, but I promise it’s as easy as… well, pie! Follow these steps, and you’ll have a golden, bubbly dessert in no time. I’m breakin’ it down real simple, so even if you’re a first-timer, you got this.
Step 1: Preheat Your Oven Like a Boss
Start by cranking your oven to 400°F (200°C). This high heat at the beginnin’ is key to gettin’ that crust and topping nice and crisp before the insides turn to mush. Give your oven a good 10-15 minutes to heat up proper—don’t rush this part. I’ve made the mistake of poppin’ a pie in too soon, and let’s just say, uneven baking ain’t pretty.
Step 2: Prep Your Pie for the Oven
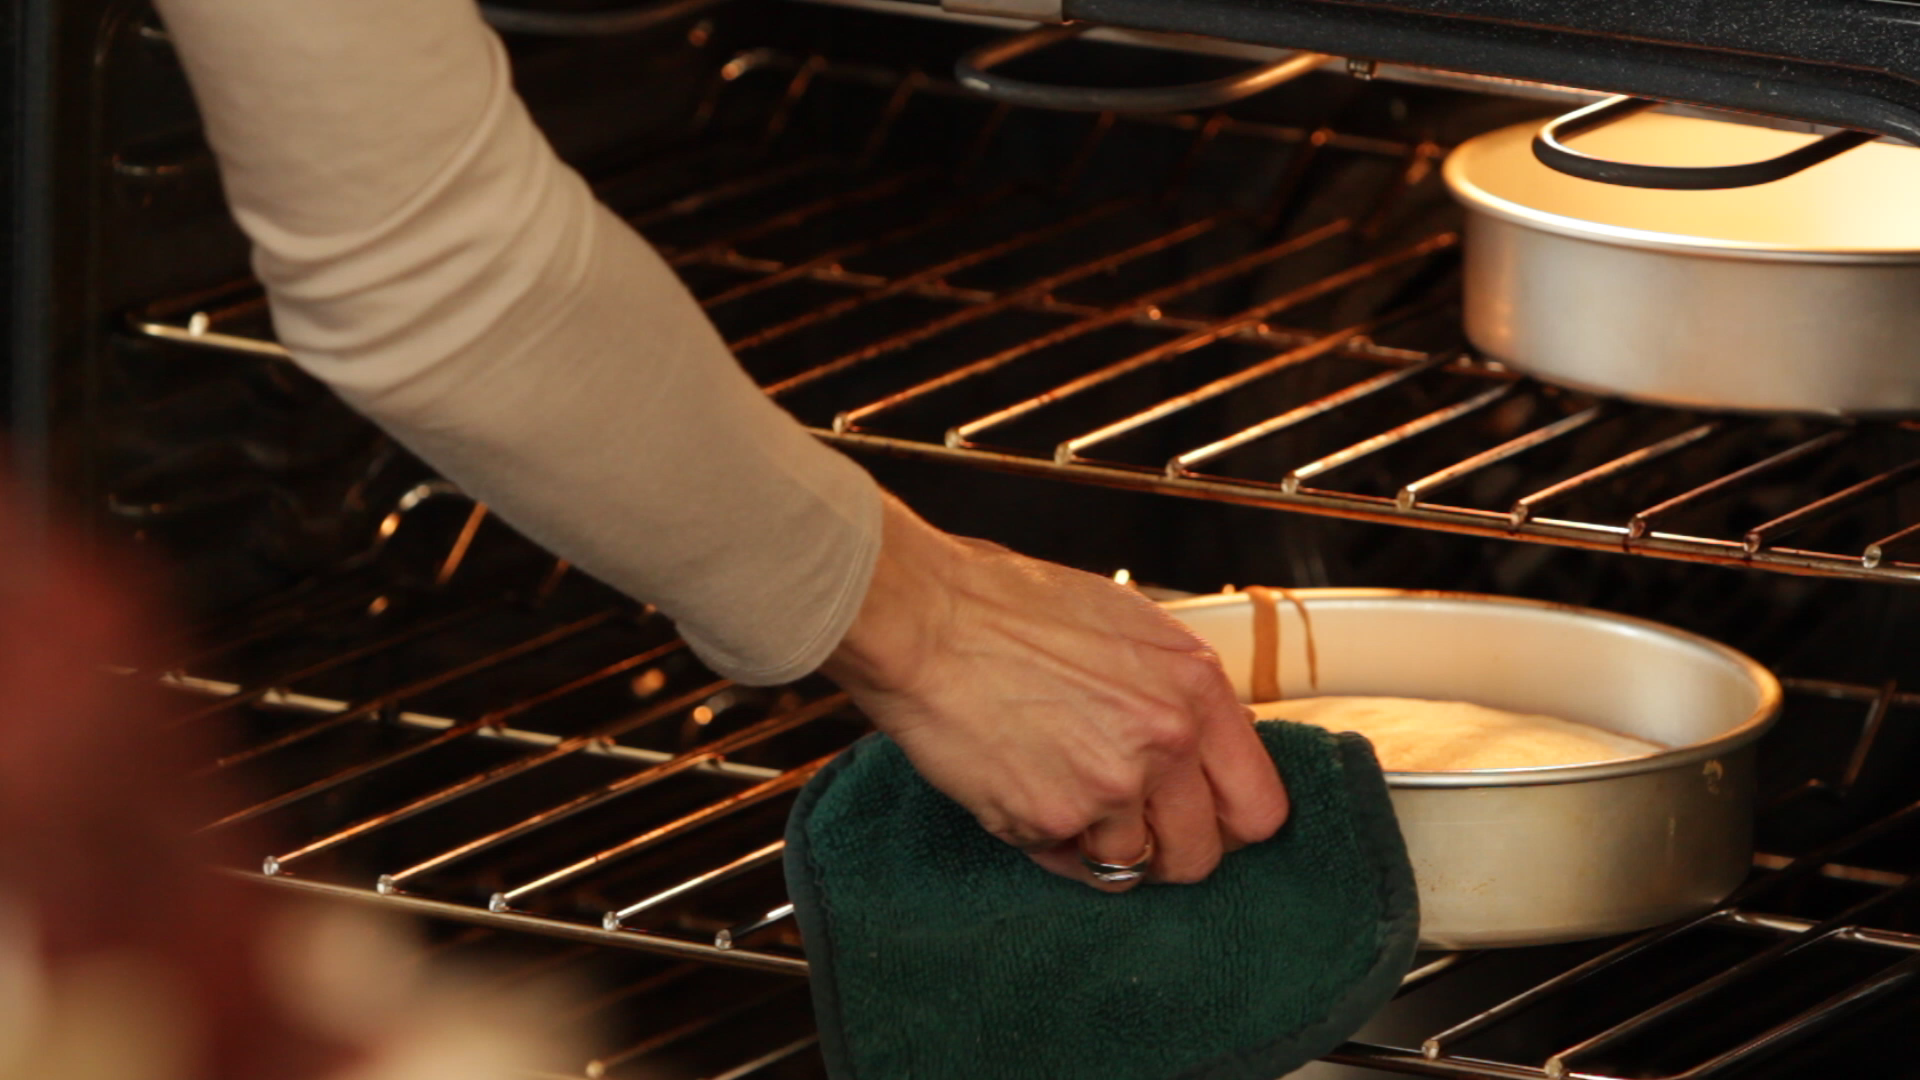
While the oven’s warmin’ up, grab your frozen Dutch apple pie. Don’t even think about thawin’ it—that’s the beauty here, straight from freezer to oven. Place it on a foil-lined cookie sheet. Why foil? Coz them apple juices might bubble over, and scrubbin’ a sticky tray ain’t nobody’s idea of fun. The cookie sheet also helps with even heat and makes it easier to slide the pie in and out.
If your pie’s already in a disposable tin, you’re golden. If it’s in a glass or ceramic dish, double-check it’s oven-safe. I’ve had a friend crack a dish by not checkin’, and it was a sad day for pie.
Step 3: Start Baking at High Heat
Once your oven’s at 400°F, slide that pie (on the cookie sheet) into the middle rack. Set a timer for 20 minutes. This initial blast of heat gets the crust goin’ and starts cookin’ the apples. Don’t cover it with foil just yet—let it do its thing. I like to peek through the oven door around the 15-minute mark just to make sure nothin’s burnin’, but that’s just me bein’ paranoid.
Step 4: Lower the Heat to Finish Cooking
After them 20 minutes, reduce the oven temp to 325°F (165°C). No need to take the pie out—just turn the dial or punch in the new temp. Let it bake for another 35-45 minutes. This lower heat cooks the apples through nice and slow so they get tender without turnin’ the crumb topping to charcoal. Total baking time should be around 55-65 minutes, dependin’ on your oven and pie size.
Step 5: Check for Doneness (Don’t Just Guess!)
How do ya know when it’s done? Look for a couple signs. First, the edges of the pie should be bubblin’ with apple juices—that means the filling is hot and cooked. Second, the pie might rise a bit in the center, like it’s puffin’ up proud. If you wanna be extra sure, poke a knife or fork into the center through the crumbs. If the apples feel soft, you’re good to go.
I’ve pulled pies out too early before, and bitin’ into crunchy apples ain’t the vibe. So, if it ain’t bubblin’ yet, give it another 5-10 minutes and check again.
Step 6: Protect That Crumb Topping if Needed
If you notice the crumb topping gettin’ too brown before the apples are done, don’t panic. Grab some foil and loosely cover the top of the pie. You can also drop the temp by another 25 degrees (to around 300°F) if it’s lookin’ real toasty. This trick has saved many a pie in my kitchen, lemme tell ya. Just make sure the foil ain’t pressed tight—ya don’t wanna squish that beautiful topping.
Step 7: Cool It Down (Patience, My Friend)
Once it’s done, pull the pie out with them oven mitts and set it on a wire rack or heat-safe surface to cool. Let it sit for at least 1-2 hours before cuttin’ into it. I know, I know, the smell is killin’ ya, but if you slice it too soon, the filling will ooze everywhere. Trust me, I’ve learned this the hard way and ended up with a pie puddle.
Handy Table for Baking Times and Temps
Just to make things crystal clear, here’s a quick cheat sheet for ya:
| Stage | Temperature | Time | Notes |
|---|---|---|---|
| Initial Bake | 400°F (200°C) | 20 minutes | Start with high heat for crisp crust. |
| Finish Bake | 325°F (165°C) | 35-45 minutes | Lower heat to cook filling through. |
| Total Time | – | 55-65 minutes | Adjust based on oven and pie size. |
| Optional Adjustment | 300°F (150°C) | Extra 5-10 minutes | If topping browns too fast, lower temp. |
Keep this table handy if you’re like me and sometimes forget stuff mid-bake!
Troubleshooting: What If Things Go Sideways?
Even with the best plans, baking can throw ya a curveball. Here’s how to handle some common oopsies when bakin’ a frozen Dutch apple pie.
- Topping Burns Before Filling is Done: Like I mentioned, cover it loosely with foil. Don’t wait till it’s black—check at the 30-minute mark if your oven runs hot.
- Crust Gets Soggy: Make sure that cookie sheet ain’t blockin’ too much heat. Sometimes I pull it out for the last 10 minutes to let the bottom crisp up. Also, don’t skip the foil lining—it helps with airflow.
- Apples Still Hard: If the timer’s up and the apples ain’t tender, keep bakin’ in 5-minute bursts at 325°F. Cover with foil if needed to avoid over-browning.
- Pie Overflows: That’s why we got the lined cookie sheet! If it’s still a mess, reduce heat a tad next time to slow the bubbling.
I’ve had my share of pie disasters, but these fixes usually get me back on track. If somethin’ else goes wrong, just roll with it—pie still tastes good even if it ain’t picture-perfect.
Why Baking from Frozen Works So Well
Now, you might be wonderin’ why we don’t thaw the pie first. Lemme break it down. Baking straight from frozen keeps the crust flaky and the topping intact. Thawin’ can make the dough soggy and the apples release too much juice before baking, leadin’ to a mess. Plus, who’s got time to wait around for a pie to defrost? Not me, that’s for sure. This method is all about convenience without sacrificin’ flavor or texture.
I remember the first time I tried this no-thaw trick—I was skeptical as heck. But when that pie came out golden and perfect, I was sold. It’s been my go-to ever since, especially around the holidays when my freezer’s stocked with goodies.
Extra Tips to Make Your Pie Shine
Wanna take your Dutch apple pie from good to freakin’ amazing? Here’s a few extra tidbits I’ve picked up over the years.
- Add a Drizzle: After it cools, drizzle some caramel sauce over the top for a fancy touch. It’s like givin’ your pie a sweet lil’ hug.
- Serve with Ice Cream: A scoop of vanilla ice cream on a warm slice? Pure magic. The cold and hot combo is outta this world.
- Check Your Oven: Ovens can be sneaky and run hotter or cooler than the dial says. If you got an oven thermometer, use it to double-check. I didn’t have one for years and wondered why my pies took forever—turns out my oven was 20 degrees off!
- Double Up: If you’re bakin’ for a crowd, make two pies at once. Most ovens can handle it—just rotate ‘em halfway through for even heat.
These lil’ tweaks don’t take much effort but make a big diff. Trust me, your taste buds will thank ya.
Storing and Reheating Your Pie (If There’s Any Left!)
If by some miracle you got leftovers, here’s how to keep that pie tasty for later. Wrap it up in plastic wrap or foil and leave it on the counter for a day or two. Any longer, and pop it in the fridge—it’ll stay good for about 4 days. Wanna save some for way later? Cut it into slices, wrap ‘em tight, and freeze in airtight containers. They’ll last a good 6 months. When you’re ready, defrost a piece and reheat in the oven at 350°F for 15-25 minutes. Microwave works too, but the topping might get a bit soft.
I usually don’t have leftovers coz my family devours pie like it’s goin’ outta style, but when I do, freezin’ portions is my jam. Nothin’ beats pullin’ out a slice on a random Wednesday for a quick treat.
A Lil’ History and Love for Dutch Apple Pie
Just for kicks, lemme tell ya a bit about this pie’s roots. Dutch apple pie, sometimes called apple crumb pie, got its name from them old-school Dutch settlers who brought their baking know-how to America. That crumbly streusel topping is what sets it apart, and I reckon it’s why so many of us love it more than the double-crust kind. It’s got a rustic, homey feel that just screams cozy.
Growin’ up, my grandma used to make this pie every fall, and the smell of apples and cinnamon would fill the whole dang house. I’d sit there, waitin’ for it to cool, even though I knew I’d burn my tongue if I snuck a bite too soon. Baking a Dutch apple pie now brings all them memories rushin’ back, and I hope it does the same for you.
Variations to Spice Things Up
If you’re feelin’ adventurous, there’s a few ways to switch up your Dutch apple pie game. Here’s some ideas I’ve messed around with:
- Add Nuts: Toss some chopped walnuts or pecans into the crumb topping for extra crunch. It’s a game-changer.
- Mix Up Spices: Beyond cinnamon, a pinch of nutmeg or allspice can give the filling a lil’ somethin’ extra.
- Sweet Twist: Swap a bit of the sugar in the topping for brown sugar if ya want a deeper, caramel-y vibe. I’ve done this a few times and ain’t looked back.
Play around with these and see what you vibe with. Cooking’s all about makin’ it your own, right?
Wrappin’ It Up with a Slice of Advice
Baking a frozen Dutch apple pie ain’t just about followin’ steps—it’s about creatin’ somethin’ warm and wonderful to share with folks you care about. Whether it’s for a holiday feast, a random dessert craving, or just to treat yourself, this pie’s got your back. Remember to start at that high heat of 400°F for 20 minutes, drop to 325°F for another 35-45, and keep an eye on them bubbles and that crumbly top. Protect it with foil if it’s brownin’ too fast, and let it cool before diggin’ in.
I’ve baked more pies than I can count, and every time, it’s a lil’ reminder of how simple things can bring big joy. So, go preheat that oven, pop in your frozen pie, and get ready for some serious yum. Got questions or a funny pie story? Drop ‘em below—I’d love to hear how it goes for ya. Now, if you’ll excuse me, I got a pie to bake myself!
How To Make Marie Callender’s Dutch Apple Pie
FAQ
How long does it take to cook a frozen Dutch apple pie?
Dutch Apple Pie:Place FROZEN pie on foil or a pie pan and place in 350 degree F oven for 1 hour and 45 minutes.
How long to bake frozen apple pie at 350 degrees?
How to cook an apple pie from frozen in the oven?
Wrap the pie in plastic wrap and freeze until ready to bake and serve. Preheat the oven to 425 degrees F. Before baking the frozen pie, brush the surface of the piecrust with cream and sprinkle with sugar. Bake for 10 minutes then turn the oven down to 375 degrees F and bake until light golden brown, about 1 hour.
Should a frozen unbaked apple pie be thawed before baking?
Pies baked from raw frozen turn out way better than baked from raw. Your bottom crust will be nice and crisp! Heat the oven to 425, put the pie in for 5-15 minutes, then turn down to 325. Sometimes if I’m busy I’ll put the pie into a pre-heated 425 oven and immediately turn it down to 325.