Follow these steps:Turn on both units, and insert a probe into the transmitter (smaller unit).Press and hold the “Mode” button for 5 seconds.The device should enter pairing mode and you’ll see the “—” flashing. Then the two units should pair-up within 10 seconds.
-
Turn on both units, and insert a probe into the transmitter (smaller unit).
-
Press and hold the “Mode” button for 5 seconds.
-
The device should enter pairing mode and you’ll see the “—” flashing. Then the two units should pair-up within 10 seconds.
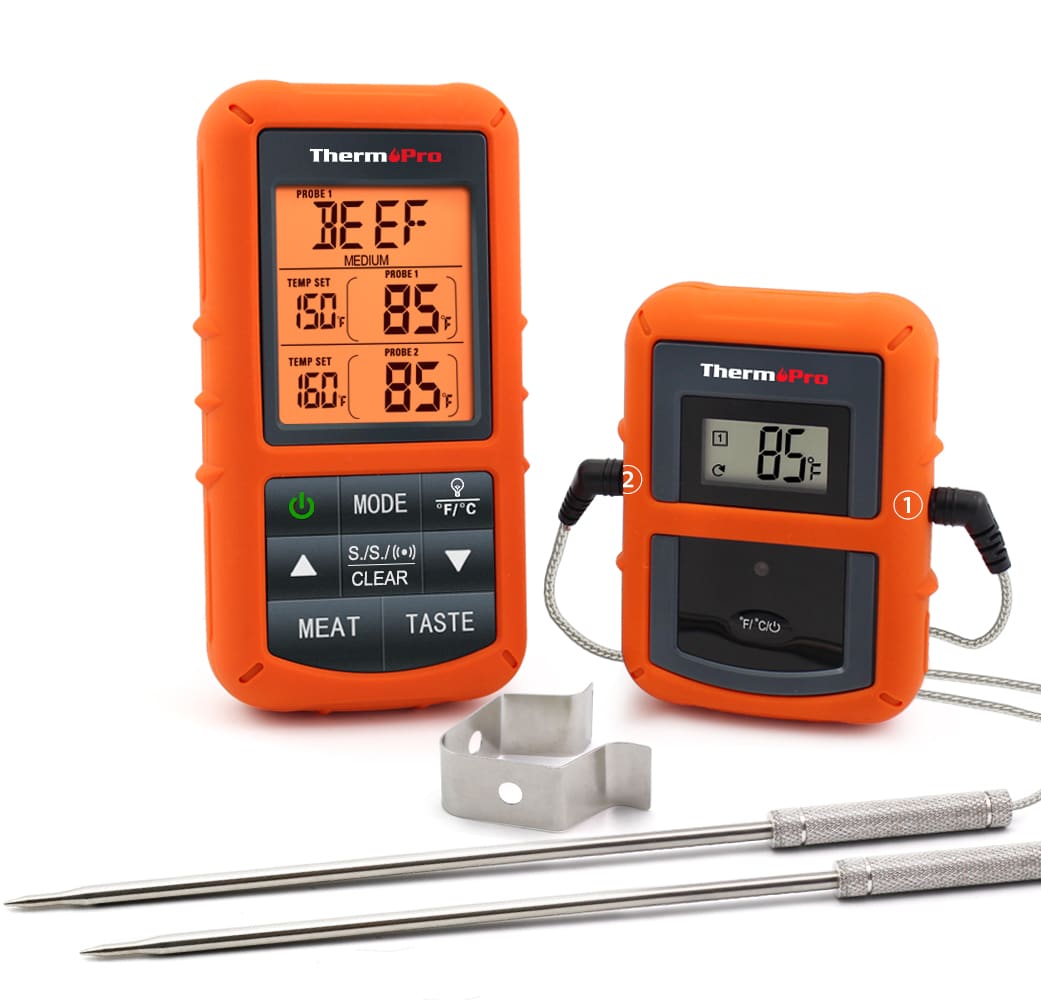
Synchronize Remote Sensors with The Base Station
Please note: each time the batteries (inserted into either the base station or remote sensor) are replaced or the base station/ remote sensor lost connection, make sure to follow the below synchronization process to pair and re-connect the base station and remote sensor:
- Position the remote sensor near the base station;
- Once the batteries are installed in the base station, the signal icon. (located on the upper left of the base station display) will flash for 3 minutes, indicating that the base station is in synchronization mode: it is waiting for remote sensors to be registered. RF
- If 3 minutes have passed after the batteries were installed in the base station and the RF signal Icon is no longer flashing, press and hold the CHANNEL/SYNC button on the back of the base station for 3-4 seconds until the RF signal icon is flashing again to set it back in synchronization mode;
- Install the batteries in the remote sensor and wait for a moment or just press either the TX or RESET button inside the remote sensor battery compartment, the remote sensor temperature/humidity will show on the base station display which indicates the synchronization is complete.
- If you have additional remote sensors, repeat the above steps to register the remote sensors (up to 3 remote sensors can be registered with one base station);
- If you have registered more than one sensor, press the CHANNEL/SYNC button on the base station to select the remote channel you want to be displayed permanently on the base station. Press CHANNEL/SYNC button until you observe a circular arrow on the base station LCD display under the channel number. The unit will then auto-scroll, changing from channel to channel every 5 seconds. Press CHANNEL/SYNC button until you observe the circular arrow disappear. The unit will stop cycling.

NOTE: If you have additional remote sensors, when you synchronize remote sensors with the base station, the unit will keep changing from channel to channel in the first three minutes, after that, you can select any channel you like or auto-scroll mode.
Battery Installation and Setup
- Open the battery compartment of the remote sensor below Figure;

- Slide the channel selector switch inside the battery compartment to your desired channel. For the first remote, you may select any channel, for additional remotes select any unused channel;
- Insert (2) AAA batteries according to the polarity markings. Replace the battery compartment cover;
- Open the battery compartment at the back of the base station and insert (2) AAA batteries according to the polarity markings. Replace the compartment door;
- Press the °F /°C button at the back of the base station to display the temperature in °F or °C.
Note
- Do not mix old and new batteries.
- Do not mix alkaline, standard (carbon-zinc), or rechargeable (nickel-cadmium) batteries.
For maximum performance in normal conditions, we recommend using good-quality alkaline batteries. If the battery power is low, there will be a low battery icon showing on the base station display.
ThermoPro TP200B Remote Temperature Monitor Indoor Outdoor Weather Thermometer Setup Video
FAQ
Why won’t my ThermoPro connect?
How do you reset a ThermoPro thermometer?
Why is my ThermoPro showing the wrong temperature?