Hey there, pie lovers! If you’ve ever pulled an apple pie outta the oven only to find a soggy mess or a rock-hard filling, I feel ya. Figuring out when an apple pie is done ain’t just a guessing game—it’s the difference between a slice of heaven and a kitchen flop. At our little baking corner, we’ve messed up enough pies to know what works, and I’m here to spill the beans on how to get that golden, gooey perfection every single time. Let’s dive right into the nitty-gritty of spotting when your pie is ready to rock your taste buds.
The Big Three Signs Your Apple Pie Is Done
Before we get all fancy, let’s cover the main ways to tell if your apple pie is good to go. These are the heavy hitters I swear by, and trust me, they’ve saved my behind more times than I can count.
-
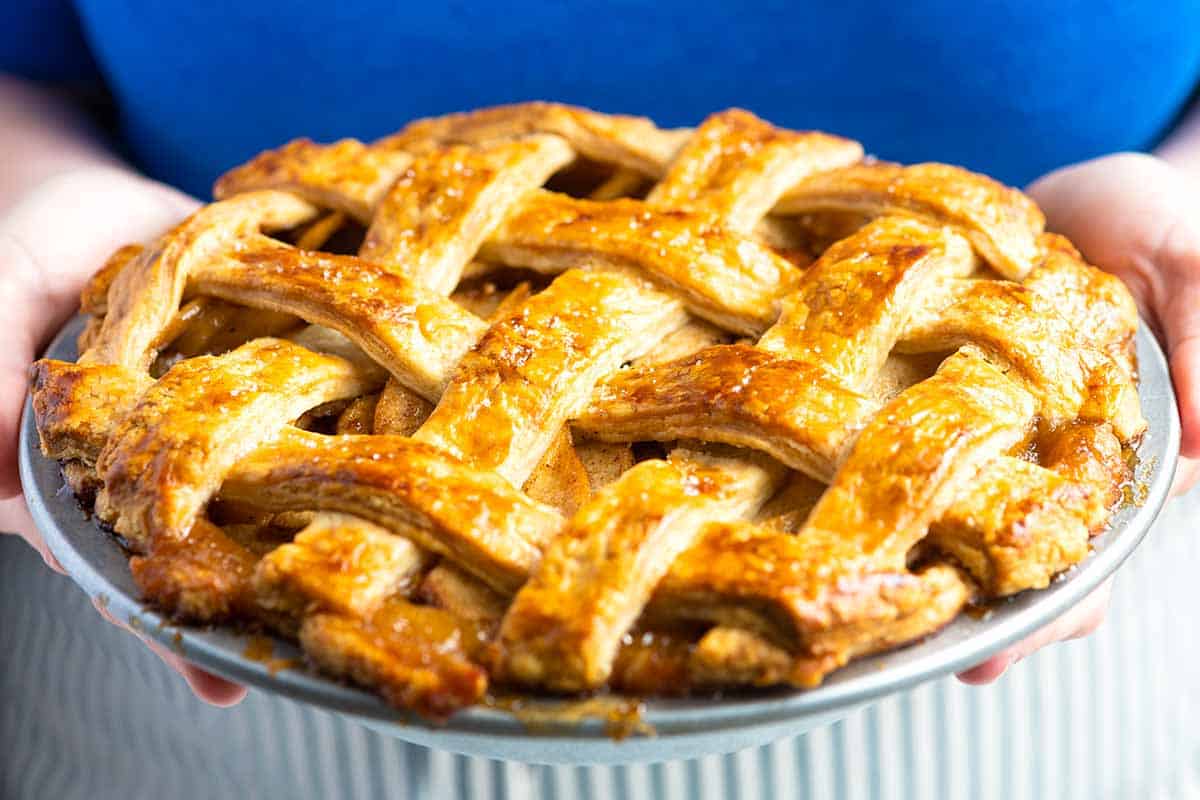
Golden-Brown Crust That Screams “Eat Me!”The first clue is right there on the surface. Your pie’s top crust should be a deep, rich golden-brown Not pale, not patchy, but a uniform color that says the sugars have caramelized and the crust has crisped up nice If it’s lookin’ like it just came outta the dough package, it needs more time, buddy.
-
Bubbling Filling Like a Hot Lava Party
Peek through the vents or lattice on top. If the filling is bubbling vigorously—especially in the center—that’s your green light. Them bubbles mean the apples are hot enough to soften and the juices have thickened up with whatever flour or starch you tossed in. No bubbles? Keep baking, my friend. -
Internal Temp That Hits the Sweet Spot
If you’re the type who likes precision (or just don’t trust your eyes), grab a digital thermometer. Stick it into the center of the pie, avoiding the crust, and look for a reading between 190-200°F (some folks even go up to 210°F). This temp guarantees tender apples and a set filling. Anything lower, and you’re risking a runny disaster.
Digging Deeper: How to Check Each Sign Like a Pro
Alright, now that you’ve got the basics, let’s break these down with some extra tricks I’ve picked up over the years Baking ain’t just science—it’s a bit of gut feel too, ya know?
1. That Golden-Brown Crust—What to Really Look For
A golden-brown crust ain’t just pretty; it’s a story of doneness Here’s how I make sure it’s legit
- Check the whole dang surface. If the edges are brown but the middle’s pale, your oven might have hot spots. Rotate that pie halfway through baking to even it out.
- Press it gently with your finger (careful, it’s hot!). The crust should feel firm and set, not soft or squishy. A doughy feel means it ain’t ready yet.
- Edges browning too fast? Slap some foil or a pie shield over ‘em to stop ‘em from burning while the rest catches up. I’ve saved many a pie this way!
2. Bubbling Filling—Why It’s a Game-Changer
Them bubbling juices are like a secret code from your pie. Here’s what I watch for:
- Look for thick, steady bubbles, not watery little pops. Watery means the filling hasn’t thickened yet, so give it more time.
- Center bubbling is key. If it’s just the edges, the middle apples might still be raw-ish. Patience, grasshopper.
- If ya don’t see bubbles after a long bake, your oven temp might be off. Crank it up a smidge or check with an oven thermometer—mine’s lied to me before!
3. Temperature Check—Gettin’ Nerdy with It
I ain’t always been a thermometer guy, but once I started using one, my pies got next-level. Here’s the deal:
- Stick the probe right in the middle through a vent. If it’s under 190°F, pop it back in for 5-10 minutes and check again.
- Don’t hit the crust or dish with the probe—it’ll mess up the reading. Aim for the filling.
- Pro tip: if you’re at a high altitude, temps might need a lil’ tweak since stuff boils lower. Add a few extra minutes if you’re up in the mountains.
Bonus Checks I Can’t Live Without
Beyond the big three, I’ve got a couple more tricks up my sleeve for double-checking:
- The Knife Test: Grab a thin knife or skewer and poke it into the center through a vent. If it slides in easy with no resistance and comes out with soft apple bits, you’re golden. Hard apples or a clean knife? Keep baking.
- The Jiggle Test: Give the pie a gentle shake (don’t burn yourself, now). It should wiggle a tad but not slosh like a water balloon. A cohesive jiggle means the filling’s set; sloshy means it’s still too liquidy.
Why Getting It Right Matters More Than Ya Think
You might be wonderin’, “Why all the fuss? Can’t I just cut in and see?” Well, lemme tell ya, cutting too early or pulling a half-baked pie can ruin all your hard work. An underdone pie means runny filling that spills everywhere and a doughy crust that sticks to your teeth. Overdone, and you got mushy apples and a crumbly, dry mess. Nailing the doneness means a pie that holds together, tastes like grandma’s, and makes folks beg for seconds. That’s the goal, ain’t it?
Common Screw-Ups and How We Fix ‘Em
Even with all these checks, pies can still throw curveballs. I’ve botched plenty in my day, so here’s how to dodge the usual traps or fix ‘em if they happen.
1. Soggy Bottom Crust—Ugh, the Worst!
A soggy bottom is like wet socks—nobody wants it. Here’s how I keep mine crisp:
- Bake on the lowest oven rack to get heat right under it. I sometimes preheat a baking sheet or pizza stone down there and set the pie on top for extra sizzle.
- Blind-bake the bottom crust a bit before adding filling. Line it with parchment and pie weights (or dry beans, if you’re cheap like me) and bake for 10 minutes to firm it up.
- Brush an egg wash on the bottom crust before filling. It’s like a lil’ shield against all that apple juice.
2. Burnt Crust Before the Filling’s Done
Nothin’ worse than a charred top and raw insides. Here’s my go-to saves:
- Tent the pie with foil if it’s browning too quick. Just make a loose dome so it don’t stick to the crust.
- Use a pie shield for the edges—they’re cheap and reusable. I got mine for like five bucks, best investment ever.
- Lower the oven rack or drop the temp by 25°F if it’s still toasting too fast. Slow and steady wins this race.
3. Runny Filling Even After Baking
If your filling’s more like soup than pie, don’t panic. I’ve been there, and here’s what works:
- Bake it longer if you catch it early. Drop the temp to 325°F and give it another 15-20 minutes to let the juices thicken.
- Next time, up the thickener—add a smidge more flour or cornstarch to the mix. Tart apples like Granny Smith also hold shape better and don’t get as watery.
- If it’s already out and runny, make a quick slurry with cornstarch and water, pour it in through a vent, and rebake for 5-10 minutes. Kinda a hail Mary, but it’s saved my pie once or twice!
Cooling Your Pie—Patience Ain’t Just a Virtue, It’s a Must
Once you’ve decided your pie is done, don’t go slicin’ into it hot outta the oven, no matter how good it smells. I’ve made that mistake, and it’s a watery mess every time. Let it cool on a wire rack for at least 2-3 hours, ideally 4. This gives the filling time to set up and the juices to settle so you don’t get a soggy slice. Plus, the flavors get all cozy and meld together while it rests. Trust me, the wait makes it taste even better.
Other Stuff That Messes with Baking Time
Not all pies bake the same, and I’ve learned the hard way that a few things can throw off your timing. Keep these in mind so you ain’t caught off guard:
- Oven Weirdness: Some ovens run hot, some cold. Get yourself an oven thermometer to double-check the real temp. Mine was off by 20 degrees, no joke!
- Apple Types: Not all apples are equal, y’all. Granny Smith holds up good but might need longer to soften. Softer ones like McIntosh break down quick and get juicier, so adjust time a bit. I like mixing tart and sweet for balance.
- Pie Dish Material: Glass dishes heat even and let you see the bottom crust, which I love. Metal heats fast but uneven sometimes. Ceramic keeps heat but takes longer to warm up. Pick what ya got, just know it might tweak the bake time.
- Altitude: If you’re high up in the hills, liquids boil at lower temps, so baking might take longer. Add a few extra minutes and check often.
Best Apples for Your Pie—Mix It Up, Yo
Speakin’ of apples, picking the right ones can make or break your pie. I always go for a mix to get depth in flavor and texture. Here’s a quick rundown of my faves in a handy table:
| Apple Type | Flavor | Texture | Why I Use It |
|---|---|---|---|
| Granny Smith | Tart, acidic | Firm, crisp | Holds shape, cuts sweetness |
| Honeycrisp | Sweet-tart | Crisp, juicy | Great balance, yummy in pies |
| Braeburn | Sweet with spice | Firm, crisp | Adds a lil’ kick, stays solid |
| Fuji | Super sweet, juicy | Crisp | Sweetness boost, good filler |
I usually do half tart, half sweet—like 4 Granny Smith and 4 Honeycrisp. Slice ‘em uniform, about ¼ inch thick, so they cook even. Peel ‘em too, ‘cause the skin can get tough in a pie.
Little Extras to Up Your Pie Game
Wanna go beyond just “done” and make a pie folks rave about? Here’s a couple quirky tips I’ve stumbled on:
- Lattice Top: Not just for looks—it lets steam out better, helping the filling set without gettin’ soggy. Plus, it’s a showstopper at the table.
- Egg Wash Magic: Brush the top crust with a mix of egg and milk before baking. It gives that shiny, pro-bakery sheen. Sprinkle some coarse sugar on there for a lil’ crunch.
- Start Hot, Finish Cool: Begin baking at a high temp, like 425°F for 15-20 minutes, to set the crust fast. Then drop to 375°F to cook through without burnin’. Works like a charm for me.
Wrapping Up—Your Pie’s Gonna Be the Talk of the Town
So there ya have it, my no-nonsense guide to knowin’ when your apple pie is done. Stick to them golden-brown crust vibes, watch for bubbling filling, and if you’re unsure, check that temp or do the knife trick. Avoid them common flubs with a few easy fixes, and don’t skip the cooling step, even if it’s killin’ ya to wait. Baking a pie is part science, part heart, and I’ve poured both into this advice ‘cause I want your kitchen to smell like victory. Got a pie story or a trick of your own? Drop it below—I’m all ears! Now go whip up that masterpiece, and lemme know how it turns out. Happy baking, y’all!
Determining if a pie is done cooking
FAQ
What temperature should apple pie be in the middle?
Bake until the pie reaches an internal temperature of 195°F (91°C), about 75 minutes. This is significantly cooler than the goal temperature for most fruit pie fillings, which are typically brought to a full boil, but it keeps the apples tender rather than mushy and avoids the problem of a watery pie.
Will apple pie thicken as it cools?
Remove the pie from the oven and let cool completely 3 to 4 hours (or you can speed the time up by placing it in the refrigerator). The filling will set and thicken as it cools. This pie is delicious served at room temperature or warm, but the filling will be runnier if it is still warm.
Do apple pies actually have to sit for 4 hours after they are cooked?
After baking, leave the pie at room temperature as the cooling process normally takes 2-4 hours. Within 4 hours, place the pie in the refrigerator. Cover loosely with plastic wrap until serving.
How do you tell if a pie is cooked?
So, other than a deeply browned color, what other visual indicators can you look for? “You can tell a fruit pie is done when the juices are thickened to a syrupy consistency and the pie is bubbling in the center, not just around the edges,” she says.May 14, 2024