Hey there, juice lovers! Ever craved a glass of apple juice that’s pure, fresh, and straight from your kitchen? Well, I’m here to spill the beans on how to cook apple juice right at home. No fancy gear needed, just some apples and a lil’ bit of patience. We’re talkin’ about a drink that’s not only tasty but also packed with goodness, minus all them nasty additives you find in store-bought stuff. So, grab an apron (or don’t, I ain’t judging), and let’s dive into makin’ your own apple juice with a few simple methods that’ll have ya sippin’ in no time!
Why Cook Apple Juice at Home? A Quick Hype-Up
Before we get to the nitty-gritty, let me tell ya why this is worth your time. Homemade apple juice is like a hug in a glass—fresh, natural, and you control what goes in it. No weird preservatives, no overload of sugar. Plus, it’s cheaper in the long run, and you get to play around with flavors. I remember my first batch; I felt like a dang alchemist turning apples into liquid gold. Let’s make that magic happen for you too!
Method 1: Cookin’ Apple Juice on the Stovetop (The Classic Way)
Since we’re talkin’ about “cooking” apple juice, let’s start with the stovetop method. This is perfect if you wanna extract every bit of flavor by simmering them apples down. It takes a bit longer but the result? Oh it’s worth it.
What You’ll Need:
- 3 red apples (like Fuji or Gala, but we’ll chat more on pickin’ apples later)
- 5 cups of water (about 1.2 liters, if ya wanna be fancy)
- ¼ cup of white sugar (optional, if you like it sweeter)
- A big pot
- A fine-mesh strainer or cheesecloth
- A bowl or pitcher to catch the juice
Steps to Apple Juice Heaven:
- Prep Them Apples: Rinse your apples under cool water to get rid of any dirt. Peel ‘em, core ‘em, and make sure to dig out all them seeds—trust me, seeds can mess with the taste and ain’t great for ya in big amounts.
- Toss in the Pot: Chuck the apple pieces, peels, and cores (if seed-free) into your pot. Pour in the 5 cups of water till everything’s nicely submerged.
- Simmer Down Now: Bring the mix to a boil over medium-high heat, then lower it to a simmer. Let it cook for about 30 minutes. You’ll see the water turn a golden hue—that’s the apple magic happenin’!
- Strain the Goodness: Place your strainer over a bowl or pitcher and pour the mixture through. Press down on the apple bits with a spoon to squeeze out every last drop.
- Sweeten If Ya Want: Stir in that ¼ cup of sugar if you like a sweeter vibe. I sometimes skip this ‘cause natural apple sweetness is plenty for me.
- Chill Out: Let it cool a bit, then pop any leftovers into an airtight container in the fridge. It’ll stay good for 2-3 days, but I bet it won’t last that long!
This method gives ya about 5 cups of juice, perfect for sharin’ with the fam or just hoggin’ it all yourself (no shame here).
Method 2: Whippin’ Up Apple Juice with a Blender (Quick ‘n’ Easy)
Don’t got time to simmer? No worries, fam. Grab a blender, and we’ll have apple juice ready in a snap. This way’s great if you just wanna blend and go.
What You’ll Need:
- 2-3 apples (mix sweet and tart ones for a balanced taste)
- ¼ to ½ cup of water (60-120 mL, just to help blend)
- Blender (duh)
- Fine-mesh strainer or cheesecloth (if ya want it smoother)
- Bowl or pitcher
Steps to Blend It Up:
- Get Them Apples Ready: Wash, core, and chop your apples into small chunks. Peel if you want a smoother texture, but I often leave the skin on for extra nutrients.
- Blend Away: Toss the apple pieces into the blender with a splash of water—start with ¼ cup and add more if it’s too thick. Crank it up to high speed and blend for about a minute till it’s smooth as heck.
- Strain or Nah: If you like a pulpy drink, you’re good to sip now. But for that store-bought juice feel, pour it through a strainer into a bowl. Push down to get all the liquid out.
- Store It Right: Pop any extra into the fridge in a sealed container. Drink within 2-3 days for the freshest taste.
This makes about a cup of juice, so scale up if you’re feedin’ a crowd I love this method ‘cause clean-up’s a breeze compared to pots and pans
Method 3: Juicin’ with a Juicer (For the Fancy Folks)
Got a juicer sittin’ around? Let’s use it! This is the fastest way to get pure apple juice without much messin’ around
What You’ll Need:
- 3 apples (any kind, but juicy ones work best)
- A juicer (obviously)
- A container to catch the juice
Steps to Juice Like a Boss:
- Prep Work: Wash your apples, core ‘em, and chop into smaller pieces to fit your juicer’s chute. Get them seeds out too.
- Juice It Up: Feed the apple chunks into the juicer as per the machine’s instructions. Watch that beautiful juice flow out while the pulp gets separated.
- Sip or Store: Collect the juice in a container. It’s ready to drink right away, or store it in the fridge for 2-3 days in somethin’ airtight.
You’ll get about a cup of juice from 3 apples, so plan accordingly. Pro tip: line the pulp basket with a plastic bag for easy cleanup. I learned that the hard way after scrubbin’ pulp outta my juicer for an hour!
Pickin’ the Perfect Apples for Your Juice
Now, let’s talk apples ‘cause not all of ‘em are created equal for juicin’. The right pick can make or break your drink, and I’ve flubbed this before by grabbin’ the wrong kind.
- Sweet Apples: Go for Fuji, Gala, or Red Delicious if you want a naturally sweet juice that don’t need extra sugar. Fuji’s my fave for that crisp, honey-like vibe.
- Tart Apples: Granny Smith or Pink Lady add a zingy kick. I mix these with sweeter ones to balance things out.
- Mix It Up: Blend different types for a killer flavor. A combo of Gala and Granny Smith is my go-to for a sweet-tart punch.
- Seasonal Tip: Grab apples when they’re in season—usually fall—for the freshest, juiciest ones. They taste better and got more nutrients.
When I first started, I used whatever apples I had, and lemme tell ya, some batches were way too tart. Experiment a bit to find your sweet spot (pun intended).
Health Perks of Sippin’ Homemade Apple Juice
Why bother makin’ your own juice? ‘Cause it’s good for ya, that’s why! Here’s the lowdown on why apple juice is a health win:
- Packed with Good Stuff: It’s loaded with vitamins like A and C, plus potassium. Keeps your immune system strong and your body hydrated.
- Antioxidant Power: Them antioxidants fight off nasty stuff in your body, reducin’ stress and maybe even lowerin’ risk of chronic junk.
- Control the Sugar: Unlike store stuff, you decide how sweet it gets. No added junk, just pure apple sweetness.
- Gut Lovin’: If ya don’t strain too much, you keep some fiber in there, which is great for digestion.
Just don’t overdo it—apple juice got natural sugars, so too much can mess with your teeth or weight. I sip a glass a day and call it good.
Flavor Hacks to Jazz Up Your Apple Juice
Plain apple juice is awesome, but sometimes ya wanna switch it up. Here’s some tricks I’ve tried to make it extra special:
- Sweeten Naturally: Add a drizzle of honey or maple syrup if it ain’t sweet enough. Honey’s my pick for a floral touch.
- Spice It Up: Toss in a pinch of cinnamon or nutmeg for a warm, cozy vibe. Cinnamon and apple juice is like a fall hug in a glass.
- Citrus Zing: Squeeze in some lemon juice to cut the sweetness and add a fresh twist. Just a lil’ bit goes a long way.
- Mix with Other Juices: Blend it with carrot or ginger juice for a wild combo. I tried apple-ginger once, and it was weirdly refreshin’!
Play around with these ideas. Last week, I added cinnamon and honey, and it felt like I was drinkin’ apple pie. So dang good!
Storage Tips to Keep It Fresh
Made too much? No prob. Here’s how to store your apple juice so it don’t go bad on ya:
- Airtight Is Key: Use a glass container or jar with a tight lid to keep out air and nasties. Plastic can work, but glass don’t mess with the taste.
- Fridge It: Stick it in the fridge right away, keepin’ it below 40°F (4°C). Away from light and heat, please!
- How Long It Lasts: Fresh apple juice stays good for 2-5 days in the fridge. If it smells funky or looks slimy, toss it—no chances!
- Freeze for Later: Wanna save it longer? Freeze it in portions. It’ll last months, but use within a week after thawin’.
I’ve lost a batch before ‘cause I left it on the counter too long. Don’t be like me—fridge it quick!
Common Goofs to Avoid When Cookin’ Apple Juice
I’ve made my fair share of mistakes, so lemme save ya some hassle with these tips:
- Don’t Overcomplicate It: You don’t need a ton of gear. A pot or blender works fine. I thought I needed a juicer at first, total waste of stress.
- Pick the Right Apples: Don’t just grab any ol’ apple. Too tart or too mealy ones can ruin the vibe. Mix sweet and tart for best results.
- Watch the Seeds: Them seeds can make your juice bitter and ain’t great to ingest. Core ‘em out every time.
- Don’t Skip Straining (If Needed): If you want clear juice, strain it. I skipped this once with the blender method, and it was like drinkin’ mush.
Learn from my flops, folks. Keep it simple, and you’ll be golden.
Servin’ Up Your Apple Juice with Style
Apple juice ain’t just a drink—it’s a vibe. Here’s how I like to serve it up:
- Chill It: Serve straight from the fridge or over ice for max refreshment.
- Fancy Touch: Add a sprig of mint or an apple slice on the glass rim for that Instagram-worthy look.
- Pair It Up: Match it with breakfast like oatmeal, or even dinner with roasted chicken. It’s a sweet balance to savory stuff.
- Smoothie Base: Use it in smoothies with other fruits. Apple-banana is my jam!
Get creative with it. Makes every sip feel like a lil’ celebration.
Why This Matters to Me (and Should to You)
Makin’ apple juice at home ain’t just about the drink—it’s about takin’ control of what you put in your body. I started doin’ this a few years back when I got tired of store-bought junk full of who-knows-what. Every batch I make feels like a small win, a way to care for myself and my peeps. Plus, it’s fun to experiment and see what flavors pop.
Let’s Wrap This Up with a Challenge
So, there ya have it—everything you need to know about how to cook apple juice like a pro. Whether you simmer on the stovetop, blitz in a blender, or juice with a machine, you’re set to enjoy a glass of pure, homemade goodness. I’m stoked to hear how it goes for you! Pick a method, grab some apples, and get to it this weekend. Drop a comment or hit me up with pics of your creation—I’d love to see ‘em. And hey, if ya got a flavor twist or a funny fail story, share that too. Let’s keep this apple juice party rollin’!
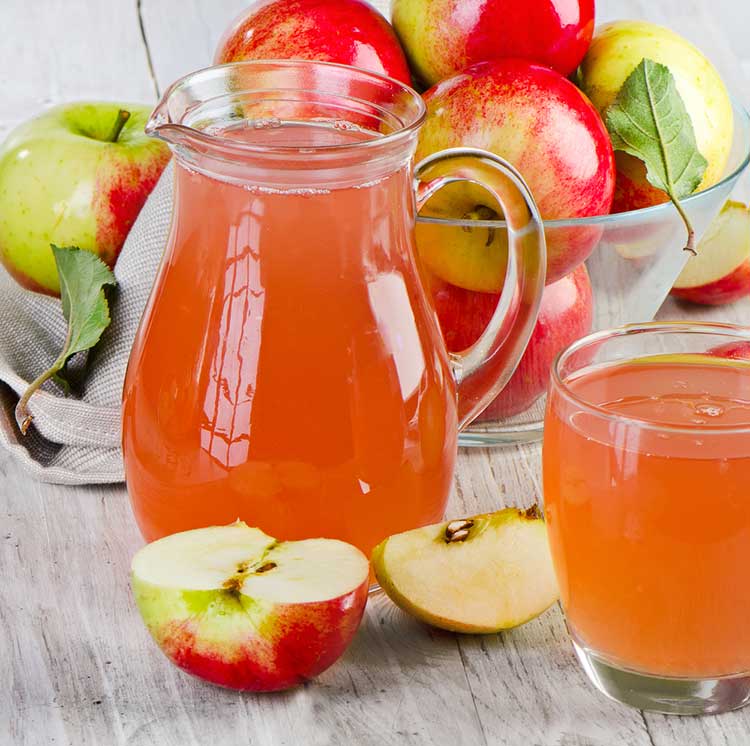
How to Make Apple Juice
FAQ
Is it okay to heat up apple juice?
You can absolutely heat up apple juice, I adore warm apple juice. It’s perfect for winter, it’s sweet, non-alcoholic and takes on spices well if you want to add some cinnamon to your warm apple juice.
How to boil apple juice?
- Step. …
- Add the apples to the pot and add enough water to just cover them. …
- Slowly boil the apples for about 20-25 minutes or until the apples are quite soft. …
- Slowly ladle the hot juice/apple mixture into a fine mesh strainer and gently mash the apples. …
- Taste the juice after it’s cooled for a bit.
How to make apple juice in a blender?
Add chopped apples to a high-speed blender with the dates, cinnamon and water. Blend until fully combined. 2. Pour the apple juice into a nut milk bag or muslin cloth and use your hands to squeeze it, getting out as much juice as you can into a bowl or jar.
Why do you boil apple juice?
The boiling method is good when you have plenty of apples to use up. The juice made this way also keeps longer for about 10 to 15 days in the refrigerator. Fresh fruit juices are better for optimal health benefits as they are free from additives.
Can you make apple juice at home?
Apple juice is a simple and delicious drink that can easily be made at home. We’ll walk you through the best ways to prepare it on your stovetop, in a blender, and even in a juicer, if you have one. In a matter of minutes, you can enjoy a fresh glass of apple juice with tools lying around your kitchen.
How do you make apple juice?
Method 1: Blender Apple Juice (Fastest) Tip: For easier blending, use a high-powered blender that can handle tough apple fibers. Method 2: Cold Press Juicer (Most Nutritious) Cold press juicers like the Omega NC800 extract maximum nutrients without heat oxidation. Method 3: Boiled Apple Juice (Longest Shelf Life)
What can you do with apple juice?
Use apple juice in fun recipes. Mix it with sparkling water for a fizzy drink. Add a splash of lemon for a tangy twist. You can even freeze the juice into popsicles. These make a sweet and healthy treat. Try using apple juice in smoothies too. Blend it with bananas and berries. This makes a tasty and nutritious drink.
Do you need to boiled apples to make juice?
However, the boiled method often makes for a higher volume of juice, AND it allows you to use lots of leftover apple scraps from other recipes, too (peels, cores, etc.) Gather your apple scraps and any additional washed thin apple slices – there’s no need to core them as you’ll be straining all the pulp afterward anyway.
How to make fresh apple juice without a juicing machine?
Choose your apples and wash them well. Peel, core, and chop the apples into pieces. Blend the apple pieces with a bit of water until smooth. Strain the mix to get rid of pulp. By following these steps, you can make fresh apple juice easily, without special equipment. Another mistake is picking the wrong apples. Not all apples are good for juicing.
How to make apple juice with a slicer?
Apple slicers cut apples into even pieces. A funnel makes pouring juice into bottles cleaner. Start by washing the apples under cool water. This removes dirt and chemicals. Use a vegetable brush for a better clean. Peel the apples using a sharp knife or peeler. Make sure to remove all the skin. This step ensures a smooth juice.