One of the most difficult things about being a recipe developer is translating all the sights, smells, sounds and feelings that I experience when Im cooking into words. When Im writing a recipe, I always try to include multiple sensory indicators that tell the reader as clearly as possible when to move from one step to the next.
But when it comes to telling when a baked good is done, sometimes you need a little more than the ubiquitous “golden brown” indicator that so many recipe writers rely on. We’ve all been there, faces pressed up to the oven door, trying to decide if the cake inside is raw, done, or over-baked. When cooking savory food, you can always put an under-cooked chicken back in the oven, but with baking, you usually only have one shot to get it right.
All my years of recipe testing and writing have left me with a pretty good ability to identify when something is done—call it my baking Spidey Sense. I’ve compiled and recorded all the telltale signs of doneness for each category of baked good so you never have to stand at the oven door and second-guess yourself again.
Hey there pie lovers! Ever yanked an apple pie outta the oven and stood there scratching yer head, wonderin’ if it’s actually done or if you’re ‘bout to serve a soggy mess? I’ve been in that exact kerfuffle more times than I can count and lemme tell ya, it ain’t just about settin’ a timer and hopin’ for the best. Figuring out if your apple pie is ready to rock is a mix of eyeballin’ some telltale signs, givin’ it a lil’ poke, and trustin’ your gut.
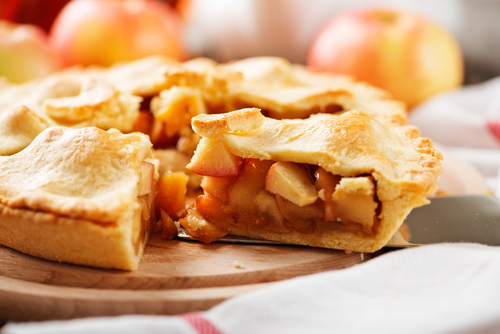
Right off the bat, here’s the quick and dirty on how to tell if your apple pie is done look for a deep golden-brown crust that’s firm when ya touch it, check if the filling is bubbling like crazy in the center (not just the edges), and if you’ve got a thermometer, aim for an internal temp of 190-210°F (88-99°C). If you ain’t got fancy tools, a knife or skewer slid into the middle should come out with soft apples and thick juice. Oh, and don’t even think ‘bout slicin’ into it right away—let it cool for a good 2-4 hours to set
But hold up there’s more to this than a quick glance. I’m gonna walk ya through every trick in the book from what your eyes can spot to how to fix a crust that’s burnin’ faster than a summer barbecue. Whether you’re a newbie baker or a seasoned pie-slinger, stick with me, and we’ll make sure your apple pie is the talk of the table.
Why Knowing When It’s Done Matters Big Time
Before we dive into the nitty-gritty, let’s chat about why this even matters. An underbaked apple pie? You’re lookin’ at a doughy crust and a runny filling that’s more soup than dessert. Overbake it, and you’ve got a dry, crumbly mess with apples turnin’ to mush. Gettin’ it just right means a flaky, golden crust huggin’ a tender, juicy filling that holds together when ya slice it. It’s the difference between “meh” and “dang, can I get seconds?” So, let’s nail this thang.
The Big Three: Key Signs Your Apple Pie Is Done
I always start with the basics when I’m checkin’ my pie. These are the top clues that’ll tell ya if it’s time to pull that beauty outta the oven. We’re talkin’ visual stuff, texture vibes, and a quick tool test if you’ve got ‘em handy.
1. Visual Vibes: The Crust and Filling Speak Loud
Your eyes are your best pals here. When I peek at my pie through the oven door, I’m lookin’ for a couple of dead giveaways:
- Golden-Brown Glory: The crust should be a rich, deep golden-brown all over. Not pale, not patchy—just a nice, even tan that screams “I’m crispy and tasty!” If it’s lookin’ like it just got a light sunburn, it ain’t ready. That color means the sugars in the dough have caramelized, givin’ ya flavor and crunch.
- Bubbling Like a Hot Tub: Check the filling through the vents or slits in the top crust. You wanna see thick, syrupy juices bubblin’ up, especially in the center. If it’s just fizzin’ a bit on the edges or lookin’ watery, the filling ain’t thickened yet. Keep it in there ‘til it’s poppin’ all over.
- Steam Slowin’ Down: Early on, steam’s gonna be escapin’ like crazy from those vents. When it starts to taper off, it’s a hint that the moisture inside is reducin’, and the filling’s gettin’ closer to done. Don’t bank on this alone, though—it’s just a side clue.
2. Texture Check: Give It a Lil’ Nudge
Sometimes ya gotta get hands-on, or at least close to it. Here’s what I do to feel out if my pie’s ready:
- Firm Crust Test: Gently press the top crust with a finger or spoon. It should feel solid and set, not squishy or doughy. If it’s givin’ way like soft bread, it needs more oven lovin’.
- The Jiggle Trick: Carefully (don’t burn yerself!) give the pie a lil’ shake. The filling should wobble just a tad, but not slosh around like a water balloon. A slight jiggle means the insides have thickened up nice. Too much splashin’? Back in the oven it goes.
3. Tool Time: Thermometer or Knife to the Rescue
If you’re like me and sometimes need hard proof, grab a tool. These are my go-to’s for double-checkin’:
- Thermometer for the Win: Stick a digital thermometer into the center of the pie through a vent, avoidin’ the crust. You’re aimin’ for 190-210°F (88-99°C). That range means the apples are tender, and the filling’s got that perfect gooey vibe. Under 190°F? Let it bake a bit more, checkin’ every 5-10 minutes.
- Knife or Skewer Poke: No thermometer? No prob. Slide a thin knife or skewer into the middle. If it glides in easy and pulls out with soft apple bits and thick juice, you’re golden. If the apples feel tough or the juice is runny, give it more time. Bonus: the knife should feel warm when ya pull it out—another good sign.
Diggin’ Deeper: Why Baking Longer Ain’t a Bad Idea
Now, here’s a lil’ secret I learned after a few undercooked disasters: with apple pies, it’s way better to bake ‘em longer than ya think. I used to yank mine out as soon as the crust looked sorta brown, scared I’d overdo it. Big mistake. The crust was chewy, and the filling was like apple soup. Turns out, fruit pies are super forgiving when it comes to extra oven time. The risk of mushy apples is way less of a headache than a watery mess that won’t set. So, if you’re on the fence, give it an extra 10-15 minutes, especially if the center ain’t bubblin’ yet. Just keep an eye on that crust—if it’s gettin’ too dark, tent it with some foil to slow the brownin’.
Common Hiccups and How to Dodge ‘Em
Even with all these tricks, apple pies can throw ya a curveball. I’ve had my share of soggy bottoms and burnt tops, but here’s how we can outsmart those issues.
Soggy Bottom Blues? Not on My Watch!
Nothin’ worse than cuttin’ into a pie and findin’ a wet, gummy bottom crust. Here’s how I keep mine crisp:
- Blind Bake First: Before dumpin’ in the apples, I sometimes bake the bottom crust solo for a bit. Line it with parchment, toss in some pie weights or dry beans, and give it 10-15 minutes in the oven. This firms it up so it don’t soak through.
- Hot Sheet Trick: Pop a bakin’ sheet in the oven while it preheats, then set your pie on it. The extra heat cooks the bottom faster. Works like a charm.
- Egg Wash Barrier: Brush a thin layer of beaten egg on the bottom crust before addin’ the filling. It’s like a shield against all that apple juice.
Crust Burnin’ Too Fast? Chill Out
If your crust is turnin’ black while the filling’s still raw, don’t panic. I’ve gotcha covered:
- Foil Tent Magic: Grab some aluminum foil and loosely drape it over the pie like a lil’ dome. This cuts the direct heat on the crust while lettin’ the insides keep cookin’. Take it off for the last 10-15 minutes if ya want more color.
- Pie Shield Save: If ya got one, a pie shield is a nifty ring that protects just the edges. Pop it on when they start lookin’ too toasty.
- Lower the Rack: Move your pie to a lower spot in the oven to get it away from the top heat. Simple fix for less burnin’.
Runny Filling Fix-Up
If your pie’s out of the oven but the filling’s more liquid than solid, here’s the play:
- Bake It More: Toss it back in at a lower temp, like 325°F (160°C), for another 15-20 minutes. This helps the juices thicken without overdoin’ the crust.
- Thickener Boost: Next time, add a smidge more flour or cornstarch to your filling mix. It’ll soak up that extra moisture.
- Pick the Right Apples: Some apples are juicier than others. I’ll chat more ‘bout varieties in a sec, but go for firmer ones if runny fillings are your nemesis.
The Coolin’ Game: Patience Pays Off
Alright, I know it’s temptin’ to dive right into that steamin’ pie the second it’s out, but hold yer horses. Lettin’ it cool for at least 2-4 hours is non-negotiable. Why? ‘Cause the filling needs time to set up. Cut too soon, and you’ve got a waterfall of apple goo ruinin’ your slice. Plus, as it chills on a wire rack, the flavors of the apples, spices, and crust kinda mingle and get even better. Trust me, I’ve learned the hard way—patience here is your best bud.
What Affects Bake Time? Know Your Variables
Not every pie bakes the same, and I’ve figured out a few things that mess with how long it takes. Keep these in mind so ya ain’t caught off guard:
- Oven Weirdness: Some ovens run hot, some cold. Mine’s a lil’ off, so I use an oven thermometer to double-check the real temp. If yours ain’t accurate, adjust up or down as needed.
- Apple Types: Different apples got different juice levels. Some turn to mush quick, others hold up longer. More on this below, but it can stretch or shrink your bake time.
- Pie Dish Vibes: Glass dishes heat even, metal’s faster but spotty, ceramic holds heat like a champ. I stick with glass so I can see the bottom crust color, but know your dish changes the game.
- Where Ya Live: If you’re up in the mountains, liquids boil at lower temps, so ya might need extra bake time. Ain’t a huge deal, just somethin’ to watch.
Apple Varieties: Pickin’ the Perfect Ones
Speakin’ of apples, not all of ‘em are pie-ready. I’ve played around with a bunch, and here’s a lil’ guide on what works best. Mixin’ a couple types can give ya a killer balance of sweet and tart.
| Apple Type | Flavor | Texture | Best For Pie? |
|---|---|---|---|
| Granny Smith | Tart, acidic | Firm, crisp | Heck yes—holds shape! |
| Honeycrisp | Sweet with tart kick | Crisp, juicy | Awesome for pies |
| Braeburn | Sweet, spicy hints | Firm, crisp | Great pick for baking |
| Gala | Mildly sweet | Crisp | Decent, better mixed |
| Fuji | Super sweet, juicy | Crisp | Okay, can get too soft |
I usually go for a combo of Granny Smith and Honeycrisp. The Granny keeps it firm and tangy, while Honeycrisp adds a sweet punch. If ya got apples that are super juicy, ya might need a longer bake to thicken things up.
Extra Tips to Up Your Pie Game
Now that we’ve covered the must-knows, here’s some bonus hacks I’ve picked up over the years to make your apple pie the star of any shindig:
- Egg Wash Shine: Brush your top crust with a beaten egg before bakin’. It gives it a glossy, pro look and helps it brown up real nice.
- Start Hot, Go Low: Crank the oven to 425°F (220°C) for the first 15-20 minutes to set the crust, then drop it to 375°F (190°C) to finish. This keeps it flaky without burnin’.
- Bottom Rack Power: Bake on the lowest rack so the bottom crust gets good heat. No more soggy surprises.
- Lattice Love: If ya feelin’ fancy, do a lattice top. It looks cool and lets more steam escape, helpin’ the filling set.
- Spice It Up: Don’t just stick to cinnamon. I’ve tossed in a pinch of nutmeg or even a drizzle of caramel for a twist. Play around and make it yours.
My Own Pie Journey: A Lil’ Story
Lemme wrap this up with a quick tale from my kitchen. First time I baked an apple pie for a family get-together, I was all nerves. Pulled it out too soon ‘cause the crust looked “fine,” and when I cut in, it was a total mess—filling everywhere, crust half raw. My granny just laughed and said, “Girl, ya gotta let it sing in there ‘til it’s bubblin’ like a pot of stew.” Next time, I let it go longer, watched for that center bubble, and checked the temp. It was a hit, and I’ve been chasin’ that perfect pie ever since. Every bake’s a lesson, y’know?
Final Thoughts: You’ve Got This!
So, there ya have it—everything I know ‘bout tellin’ if an apple pie is done. From spottin’ that golden crust and bubblin’ filling to pokin’ it with a knife or checkin’ the temp, you’ve got all the tools to bake with confidence. Remember, it ain’t just science; it’s a lil’ bit of heart and a whole lotta patience, especially when ya let it cool. Next time you’re whippin’ up this classic, keep these tips close, and I betcha it’ll be the best dang pie you’ve ever made. Got a pie story or a trick of yer own? Drop it in the comments—I’m all ears! Let’s keep this bakin’ party goin’.
Cakes, Quickbreads, and Muffins
If you’ve baked a cake before you’re probably familiar with the “toothpick test.” Many recipes tell you to stick a cake tester, skewer, or toothpick into the middle of the cake and if it comes out clean, the cake is done. This is a useful test, but it’s not the sole indicator. Sometimes oil-based cakes or quickbreads produce a clean tester before the batter is fully cooked. This is why I also recommend using your finger to tap lightly in the center of the cake. It should feel firm and lightly springy to the touch. If the batter sticks to your finger or doesn’t produce a bit of resistance, it’s not done.
Another way to tell is color and surface texture. For white or yellow cakes, the surface should be uniformly golden brown all the way across, not just around the edges. Raw batter is shiny because of the butter or oil content; cooked batter is matte. If the edges are dark but the center is still pale and shiny (which happens sometimes if you use a dark pan, which conducts heat differently from a lighter-colored one), reduce the oven temperature by 25° and keep baking.
How long you bake a cookie depends on what kind of texture you’re looking for in the finished product. The more you bake it the crisper it’ll be. For a classic chocolate chip, most of the time you’re looking for that contrast between a crisp edge and a chewy center. This can be tricky because the cookie will seem under-baked on the cookie sheet but will firm up as it cools. I always look for the edges to be visibly browned and “set.” This means that when I poke the edge of the cookie, my finger does not leave an indentation. To avoid under-baking to the point of rawness (which is actually not as desirable as it sounds), look for the center to have lost its sheen and taken on a golden color, but unlike the edge it will yield to a light poke.
Here’s where things get a little tricky. In the case of brownies and blondies, most of the time you want to intentionally under-bake them to achieve that ideal moist, fudgy texture. The key is not under-baking them too much or too little. The toothpick test should produce a few errant crumbs stuck to the tester but not a smooth smear of batter. The edges will feel firm to the touch (not just set but actually kind of firm and crispy) and the surface will feel soft when pressed but will not spring back.
With fruit pies you can rely entirely on visual cues. Its actually pretty difficult to over-bake a fruit pie (short of burning it, that is). If you have one, use a glass pie plate and look for the pastry to be very brown on the bottom—the bottom crust takes the longest to cook, and most people never cook it long enough, in my humble opinion. Don’t pull the pie until you see the filling juices bubbling in the center as well as around the edges. If it’s a pie with a full top crust, you won’t see juices bubbling, so just bake it until you see color underneath (this should take well over an hour, sometimes two hours or more, at 350°).
Custard (and Custard-Based Pies)
Custards are a category of baked good made from a mixture of eggs and dairy, and includes things like cheesecake, crème brulée, and pumpkin pie. The eggs slowly set in the oven to produce a soft, silky, scoop-able texture. Because the eggs will eventually overcook and curdle, you want to remove a custard from the oven just at the point of doneness. When you take it out, the residual heat continues to cook the eggs. The key is knowing when the custard is just set enough in the oven that it will finish cooking—but not over-cook—as it cools. Take pumpkin pie, for example. If you nudge the pie during baking and the center produces large, slow-moving ripples, it’s done. Pulling it too soon will result in a pie that isn’t fully set and runs in the center when sliced, so think less the cup of water in the Jeep in Jurassic Park and more Jello jigglers (children of the 90s will understand). You’re looking for a leisurely wobble.
Apple Pie: The Done Test
FAQ
How do you tell if a pie is fully cooked?
How do you test apple pie for doneness?
A visual cue is helpful when determining the pie’s doneness. If the crust is golden, and the filling is bubbling up through the lattice, the apple pie is done. If you want to be precise, the internal temperature of the filling taken with an instant-read thermometer should be around 200°F (93°C) when done.
How to know when a fruit pie is done baking?
If you nudge the pie during baking and the center produces large, slow-moving ripples, it’s done.Nov 16, 2017
Do apple pies actually have to sit for 4 hours after they are cooked?
After baking, leave the pie at room temperature as the cooling process normally takes 2-4 hours. Within 4 hours, place the pie in the refrigerator. Cover loosely with plastic wrap until serving.