When cooking apples, the go-to method tends to be to pop them into a pan with some water and let them gently cook. But this isn’t the only way to cook them! Here’s how to steam apples with cinnamon and mint.
Hey there, kitchen warriors! Ever wanted to whip up some tender, juicy steamed apples for a quick snack, baby food, or a cozy dessert, only to realize you ain’t got a steamer basket? No worries! I’ve been there, rummaging through drawers, cussing under my breath, and still managed to get those apples steamin’ like a pro At our little corner of culinary chaos, we’ve got your back with some whacko but wickedly effective ways to steam apples without any fancy gear Let’s dive right into the good stuff—how to do it with stuff you’ve probably got lying around!
How to Steam Apples Without a Steamer: 3 Genius Methods
Steaming apples is all about getting that soft melt-in-your-mouth texture while keeping the good nutrients locked in. No steamer? No problem. Here are three tried-and-true methods I’ve used a gazillion times when I’m in a pinch.
Method 1: Microwave Magic—Quick and Dirty
If you’re short on time or just don’t wanna mess with pots and pans, the microwave is your best buddy. It’s fast, easy, and gets the job done with minimal cleanup. Here’s how I do it:
- Grab Your Gear: You’ll need a microwave-safe bowl, a lid or plate (also microwave-safe), and a spoon or fork to check doneness.
- Prep the Apples: Wash and core 1-2 medium apples. Peel ‘em if you’re feeding little ones or want a smoother texture, or leave the skin on for extra fiber. Slice into bite-sized chunks or wedges—about ¼ to ½ inch thick so they cook even.
- Set It Up: Toss the apple pieces into the bowl. Add 1-2 tablespoons of water—just enough to create steam. Too much, and you’ll get mushy soup. Cover the bowl with a lid or plate, leaving a tiny vent for steam to sneak out.
- Zap It: Microwave on high for 2 minutes. Check by poking with a fork—if it slides in easy, you’re golden. If not, go another 30 seconds at a time ‘til they’re tender. Usually takes 2-4 minutes total, depending on your microwave’s mood.
- Cool and Serve: Let ‘em sit a sec to cool down before diggin’ in. Watch out for hot steam when you lift that lid!
Why I Love This It’s stupid quick. Perfect for a solo snack or when the kids are hollerin’ for something now. Downside? Texture can be a tad uneven sometimes but for a fast fix it’s unbeatable.
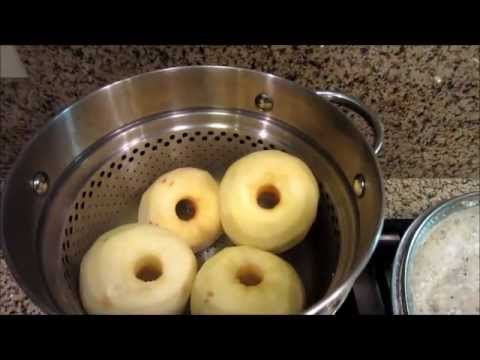
Method 2: Metal Colander Trick—Old School Cool
Got a metal colander kickin’ around? That thing you use to drain pasta can double as a makeshift steamer. It’s a bit more hands-on than the microwave but gives you better control. Here’s the deal:
- What You Need: A metal colander that fits inside a pot (with some space at the bottom), a pot lid, and water.
- Apple Prep: Same drill—wash, core, and slice 2-3 apples into 1-inch chunks or wedges. Uniform size means they cook at the same rate.
- Set the Stage: Pour about an inch of water into the pot. Make sure it don’t touch the bottom of the colander when you place it in—otherwise, you’re boilin’, not steamin’.
- Load It Up: Place the colander in the pot, dump the apple slices in, and spread ‘em out in a single layer if you can. Pop the lid on tight to trap that steam.
- Heat It: Crank the stove to medium-high ‘til the water simmers (you’ll see steam risin’). Then lower to medium-low and let it steam for 5-10 minutes.
- Check It: Carefully lift the lid—away from your face, ‘cause that steam burns like heck—and poke an apple with a fork. Easy pierce means they’re ready. If not, give it a couple more minutes.
- Finish Up: Turn off the heat, remove the colander (use mitts; it’s hot), and let the apples cool a bit.
Why This Rocks: It mimics a real steamer setup, so the apples cook nice and even. It’s great for bigger batches too. Just gotta make sure your colander fits snug in the pot.
Method 3: Foil Ball Hack—DIY Like a Boss
This one’s my fave when I’m feelin’ crafty or just can’t find anything else. It’s a bit fiddly, but man, does it work! You’re basically buildin’ a lil’ platform with foil to keep apples outta the water. Let’s roll:
- Gear Up: You need aluminum foil, a heat-safe plate (like a ceramic one), a pot with a lid, and water.
- Apple Game: Wash, core, and cut 2-3 apples into 1-inch pieces. Keep ‘em consistent for even cookin’.
- Make Foil Balls: Tear off three pieces of foil and roll ‘em into tight golf ball-sized spheres. These are gonna be your stand, so make ‘em sturdy.
- Set the Scene: Pour ½ to 1 inch of water into the pot. Place the foil balls in a triangle shape at the bottom. Rest the heat-safe plate on top of the balls—it should sit steady above the water. If it wobbles, adjust the balls.
- Add Apples: Arrange the apple slices on the plate in a single layer. Cover the pot with the lid to lock in steam.
- Steam Away: Heat on medium-high ‘til the water simmers, then drop to medium-low. Let it go for 5-10 minutes, dependin’ on how soft you want ‘em.
- Test and Done: Peek under the lid (careful of steam!) and fork-test an apple. If it’s tender, you’re good. Use oven mitts to lift the plate out—everything’s hot as blazes.
Why I’m Obsessed: This feels like a MacGyver move, and I love showin’ it off. It’s perfect if you got no colander or steamer, just basic kitchen stuff. Plus, it’s kinda fun to rig up!
Why Bother Steamin’ Apples Anyway?
Before we get deeper into the nitty-gritty, let’s chat about why steaming apples is worth the hassle, especially without a steamer. I mean, you could just boil ‘em, right? Nah, steaming’s got the upper hand for a few big reasons.
- Nutrient Powerhouse: When you boil apples, all them good vitamins like C and B sneak out into the water, and you toss ‘em down the drain. Steaming keeps the apples outta the water, so more of that healthy stuff stays inside. More bang for your bite!
- Flavor on Point: Boiling can wash out that sweet, tangy apple taste, makin’ ‘em bland. Steaming locks in the natural flavor, so they taste like apples, not soggy nothin’.
- Texture Control: Steaming gives ya tender, not mushy, results if you time it right. You can go crisp-tender for snacks or super soft for purees. Boiling often turns ‘em to sludge.
- Healthy Vibes: No oil, no sugar needed—just pure fruit goodness. Perfect for kids, diets, or just keepin’ things light.
I’ve switched to steaming over boiling ever since I noticed how much better the apples hold up. It’s a small change that makes a huge diff, trust me.
Pickin’ the Right Apples for Steamin’
Not all apples are gonna play nice when you steam ‘em. Some turn to sauce real quick, others keep their shape. Here’s what I’ve learned about pickin’ the best ones, dependin’ on what you’re after.
- Gala: My go-to. Mildly sweet, gets tender but don’t fall apart easy. Great for baby food, snacks, or toppin’ oatmeal.
- Fuji: Super sweet and crisp, holds shape like a champ. Awesome if you want distinct slices for a side dish.
- Honeycrisp: Sweet with a tart kick, stays a bit firm. I use these for yogurt toppers or adult snacks when I want some bite.
- Granny Smith: Tart and firm, softens up with a zing. Pair these with savory stuff like pork chops or for a less-sweet dessert.
- Golden Delicious: Sweet and soft, breaks down fast. Perfect for a quick chunky applesauce or smooth puree.
If you’re new to this, start with Gala. They’re forgivin’ and got a flavor everyone seems to dig. I always grab a mix when I’m at the market, just to experiment with textures.
Preppin’ Your Apples Like a Pro
Before you steam, ya gotta get those apples ready. It ain’t rocket science, but a few tricks can save you grief. Here’s how I handle it:
- Wash ‘Em Good: Always rinse under cold water to get rid of dirt or waxy stuff. I just rub ‘em with my hands—don’t need no fancy scrub.
- Peel or Nah? Depends on who’s eatin’. For babies under a year, peel every time—skin’s tough for ‘em to digest and could be a chokin’ risk. For toddlers or grown-ups, I leave it on for extra nutrients and color, unless I’m makin’ a silky puree. Your call!
- Core and Slice: Use a corer if you got one, or just cut around the middle to ditch the seeds. Slice into uniform pieces—about 1 inch for stovetop methods, smaller for microwave. Even cuts mean even cookin’.
- Don’t Crowd: When placin’ ‘em in your setup, give ‘em space. Pilin’ ‘em up makes some pieces raw while others overcook. Single layer is the way to go.
I’ve messed up by skippin’ the uniform cuttin’ before, and half my batch was mush while the other half was hard. Learn from my dumb moment—take the extra sec to slice right.
How Long to Steam for That Perfect Bite
Timin’ is everything with steaming. Too short, and they’re crunchy when you don’t want ‘em to be. Too long, and you got applesauce before you meant to. Here’s a lil’ guide I follow, based on how I like the texture. Test with a fork to be sure, ‘cause apple type and slice size mess with the clock.
| Desired Texture | Steaming Time (Stovetop) | Steaming Time (Microwave) | Best For |
|---|---|---|---|
| Tender-Crisp | 4-5 minutes | 2-2.5 minutes | Snacks, salads, cheese pairing |
| Soft & Tender | 6-8 minutes | 2.5-3 minutes | Oatmeal toppers, yogurt, side dish |
| Very Soft (For Mashin’) | 9-12 minutes | 3-4 minutes | Baby food, applesauce, pie fillin’ |
I usually aim for soft and tender when I’m toppin’ my mornin’ oats. If I’m makin’ baby food for my niece, I go the full monty to very soft so it blends easy. Keep an eye on ‘em—lift the lid quick and poke to check.
Jazzin’ Up Your Steamed Apples
Plain steamed apples are yummy, but a lil’ flavor boost can turn ‘em into somethin’ special. I’ve played around with a few add-ins over the years, and these are my faves. Keep it light—apples got a delicate taste you don’t wanna drown.
- Cinnamon: Classic for a reason. Sprinkle a pinch of ground cinnamon on after steamin’, or toss a cinnamon stick in the water for a subtle, cozy vibe.
- Nutmeg: Just a tiny dash—think holiday vibes. It’s strong, so don’t overdo it.
- Vanilla: A couple drops of vanilla extract in the steamin’ water makes ‘em taste like dessert. Smells amazin’ too.
- Lemon Juice: Squeeze a bit on the slices before steamin’ to stop brownin’ and add a fresh, zesty note. Balances the sweet real nice.
I’ve gone nuts with cinnamon before and regretted it—too much, and it’s like eatin’ potpourri. Start small, taste, then add more if ya want.
What to Do with Steamed Apples
Now that you’ve got these perfectly steamed apples, what’s next? Oh man, the options are endless. Here’s some ways we use ‘em at home:
- Kid Snacks: Straight-up finger food for little hands. If they’re tender-crisp, older kids can munch ‘em as is. Softer ones work for toddlers.
- Baby Food: Puree very soft apples with a blender or fork for a baby’s first food. No sugar needed if you picked a sweet variety like Gala. My sister swears by this for her lil’ one.
- Breakfast Boost: Toss ‘em on oatmeal, yogurt, or pancakes for a warm, fruity kick. I drizzle a lil’ honey on mine—chef’s kiss!
- Dessert Base: Mix into pie fillings, crumbles, or just eat with a scoop of ice cream. Soft apples are perfect for bakin’ without extra cookin’.
- Savory Pairin’: Pair tart steamed apples with pork chops or chicken. The sweet-tart combo cuts through rich meats like magic.
I’ve even thrown leftover steamed apples into smoothies for a weird but tasty twist. Get creative—there ain’t no wrong way to enjoy ‘em.
Storin’ Your Steamed Apples Right
Made too much? No sweat. You can keep steamed apples fresh for later with a couple easy steps. I’ve lost batches to soggy messes before, so listen up on how to store ‘em proper.
- In the Fridge: Let ‘em cool completely to room temp first—don’t trap heat or they’ll get watery. Pop into an airtight container. They’ll stay good for 3-4 days. I use glass jars ‘cause plastic sometimes holds smells.
- In the Freezer (Slices): For longer, freeze ‘em. Spread slices on a parchment-lined tray in a single layer and freeze ‘til solid—takes 1-2 hours. This stops ‘em from stickin’ together. Then toss into a freezer bag or container. Good for up to 3 months.
- In the Freezer (Puree): If you’ve mashed or blended ‘em, pour into ice cube trays for handy portions. Freeze solid, then transfer cubes to a bag. Also lasts 3 months. I do this for baby food all the time—pop a cube out and thaw as needed.
Make sure they’re cool before storin’, or you’ll get condensation and ruin the texture. Been there, done that, hated it.
Final Bites: Get Steamin’ Today!
So there ya have it, folks—steamin’ apples without a steamer ain’t no biggie. Whether you’re zappin’ ‘em in the microwave, riggin’ up foil balls, or usin’ a colander, you’ve got options to make this healthy, tasty treat happen with what’s in your kitchen. I’ve shared my best hacks, fave apple picks, and even some flavor twists to keep things fun. Now it’s your turn to give it a whirl. Try one of these methods, whip up somethin’ delish, and lemme know how it goes! Drop a comment or tag us with your apple creations—we’re dyin’ to see what you cook up. Let’s keep the kitchen adventures rollin’!
What You’ll Need to Steam Apples
Below is what you’ll need if you want to steam enough apples for around 4 people. Obviously, it depends on how you plan on serving them.
- 4 Apples: Choose firm apple varieties like Bramley, Granny Smith, or Honeycrisp for steaming, as they hold their shape and provide a good balance of flavour. Avoid softer, mealy apples that disintegrate easily when heated.
- 1 Cinnamon Stick: You’ll want to use a stick of cinnamon and not ground cinnamon, as most of the cinnamon will fall through the holes of your basket.
- 1 Sprig of Mint: Mint tends to be quite a punch flavour so 1 sprig of mint will be ample.
How to Steam Apples In a Basket
This is the best way to steam apples. You just need to use a steamer basket (or even a colander) to steam them gently.
- Prepare the Apples Wash the apples and peel them if desired. Core and cut them into quarters or eighths, depending on how large you want the pieces to be.
- Prep the Pot Fill the pot with about 5 cm (2 inches) of water. Add the cinnamon stick to the water for infusion.
- Boil the Water Place the pot on the stove and bring the water to a boil.
- Place the Apples Once the water is boiling, place the colander or steamer basket into the pot. Arrange the apple slices evenly in the basket and lay the sprig of mint on top.
- Steam the Apples Cover the pot with the lid and steam the apples for about 10 to 15 minutes, until they are tender but not mushy.
- Check the Apples Lift the lid carefully to avoid the steam and check the tenderness of the apples with a fork.
- Serve or Store Remove the apples and let them cool slightly before serving. Discard the cinnamon stick and mint sprig, or you can use them as garnish for a more decorative presentation.
While a steamer basket is ideal, you can improvise with a colander or sieve, or make a makeshift steamer with aluminium foil or a heat-safe plate in a pot with a lid.
steaming fruits and vegetables for baby #6monthsold #babyfood #babyfoodrecipe #babyfoodideas
FAQ
How can I steam if I don’t have a steamer?
The technique is simple: fill a medium pot with 1/2 inch of water, place three golf ball–sized balls of aluminum foil on the bottom, rest a heat-proof plate on top of the foil balls, cover the pot, and bring the water to a boil. Add vegetables to the plate, cover, and steam until crisp-tender.
How to steam fruit in the microwave?
To steam fruit in the microwave, place cut fruit in a microwave-safe dish with 1-2 tablespoons of water, cover with a lid or microwave-safe plastic wrap (leaving a small vent), and microwave on high for 1-3 minutes, checking for desired tenderness. The fruit will cook using the steam generated from the water, keeping it tender while retaining nutrients.
How to steam on a stove top?
If using a steaming basket, bring 2 inches of water to a boil in a large pot then place steaming basket on top and steam for 10 minutes.Feb 1, 2021